Use Worklist Keywords to Help Your Keywording in Lightroom

Eric Scouten

So you want to make sure you’ve identified all of the people you know in your Lightroom catalog, but … you have several thousand photos in your catalog and you don’t want to spend time reviewing photos you’ve already keyworded. How to avoid that?

This is where a technique I call worklist keywords comes in handy. The idea is simple: Use another keyword to keep track of which photos you’ve reviewed for a certain subject area. Here’s how it works:

Getting Started
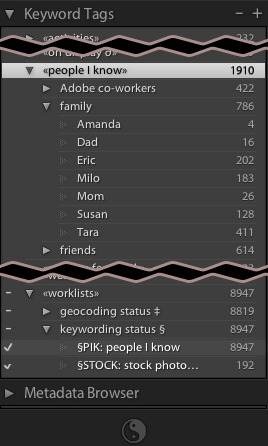
Worklist Keywords

When I’m embarking on a new keywording effort, I start by building up keywords for the subject matter. (You can also do this on an ad-hoc basis once you’re reviewing the keywords.) As an example, this is the keywords panel from my Lightroom catalog showing the keyword hierarchy for people I know and my family. (Side note: I surround my top-level keyword names — the categories — with «» symbols to ensure that they fall to the bottom of the list. That way, if I add a new keyword and forget to place it into my keywording hierarchy, it shows up at the top of the list. It’s obviously different from the other top-level keywords, which serves as a reminder to find a home for it in the hierarchy.)

Before I start actually applying those keywords, however, I also create the extra keyword to track my keywording progress. I like to organize these under another keyword category I call «worklists». (This is just an organizational tactic I like; adapt it to suit your taste.) What is important here is to give your worklist keywords a tag phrase that is unlikely to occur anywhere else in your metadata. On the Mac, it’s relatively easy to type unusual symbols, so I like to use those in my worklist keyword names.
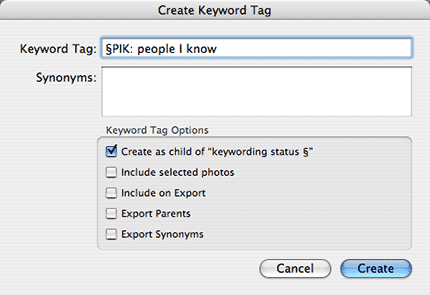
Creating a New Worklist Keyword

For example, I’ve created a keyword named “§PIK: people I know”. (On U.S. Mac keyboards, the § symbol can by entered by typing Option-6.) I don’t think this keyword is interesting to anybody but me, so I’ve turned off the options for include on export, export parents, and export synonyms in the options for this keyword.

Now that you’ve created your worklist keyword, you’re ready to get started.

Reviewing Your Worklist

Lightroom doesn’t offer the ability to search for photos that don’t have a particular keyword. I expect that we’ll that feature someday, but until we do, this workaround can get the job done.
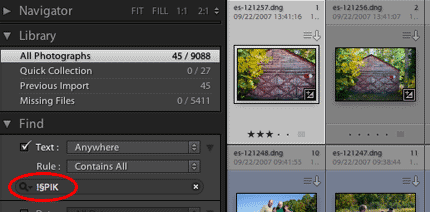
Filtering for Your Worklist Keyword

In Lightroom’s Find panel, type ! followed by the distinctive phrase for your worklist keyword. The ! is a special shortcut that tells Lightroom to find those photos that don’t match the remainder of that word. Lightroom will immediately narrow your photo library to those photos that don’t match that string. Make sure the Text popup is set to either “Anywhere” (the default) or “Keywords.” Also make sure the Rule popup is set to “Contains” or “Contains All”.

In this screen shot, I have used this technique to filter my library from over 9,000 photos down to the 45 photos I haven’t yet reviewed for people I know.

With this filter in place, you can make short work of reviewing and updating the remaining photos.

Whittle Through the Worklist
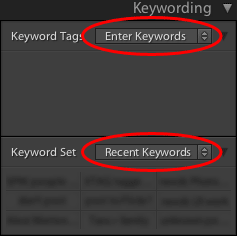
Keywording Panel Settings

For this stage of the game, I check a few quick settings in the Library module:

  • Library is in grid view. Thumbnails are just large enough that I can recognize faces.
  • Keywording panel (on the right side) is open.
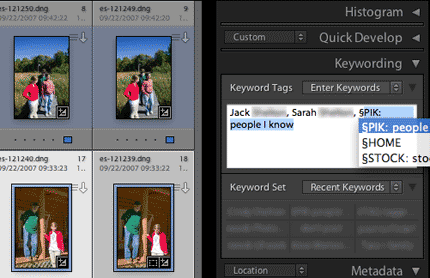
  • In the keywording panel, the Keyword Tags popup is set to “Enter Keywords” and the Keyword Set popup is set to “Recent Keywords.”
Applying the First Keyword

Pick your first few photos to keyword. Here, I’ve selected two photos of my friend Jack and his daughter Sarah. I type their names in the Keywording panel. After I’ve got them entered, then I start typing §PIK. Notice from the screen shot that Lightroom’s auto-completion picked up on my keyword name, so I don’t have to finish typing.

Now here’s where you can start to really pick up speed. As soon as you apply the worklist keyword, two nice things happen: (1) the photos disappear from the library grid, and (2) the interesting keywords appear in your Recent Keywords list. If, like me, you shoot series of photos with various friends moving in and out of them, you’ll pretty quickly have all the friends who were there on a particular day in the Recents list. Plus, your worklist keyword appears there right away. (You were getting tired of finding that Option-6 or Alt+01-whatever-whatever character, right? 🙂 ) So now you can mouse-click your way through all the photos with your friends in them.

Update: Dan’s comment reminded me of something I had meant to say when I was writing this post: Semantically, applying the worklist keyword means “I’ve scanned this photo for people I know,” not “this photo has people I know.” So you should apply it even to photos that don’t contain people you know, once you’ve verified that. This will keep it off the list for future reviews.

Extending the Concept

You can create multiple worklist keywords similar to this one for different tasks. In my catalog, there are worklists for:

  • copyright registration
  • geocoding status
  • several different keyword lists
  • review status (i.e. is this photo worth displaying somewhere?)

I use a similar approach to ensure that all of my photos have star ratings and color labels.
Filtering for No Rating

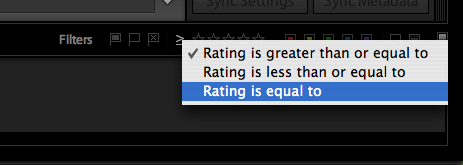
To see photos without star ratings, open the filmstrip at the bottom of the catalog window. Look for the >= sign in the Filters area. Set it to “Rating is equal to” (as shown in the screen shot). Select one or more photos and type 1, 2, 3, 4, or 5 to give it a star rating. As soon as you do this, the photo(s) disappear from view and you have another set to rate. (I often switch to loupe view in the library module to get a better sense of the quality of the photo when I’m doing this.)

Similarly, you can whittle through all photos without a color label. There isn’t an on-screen shortcut for this, but you can get there by going to the menu bar and selecting Library > Filter by Color Label > No Label. Don’t forget to go back and select Library > Filter by Color Label > Reset this Filter when you’re done.

Lightroom’s Goals

Mark Hamburg

I’ve covered much of this in some of George Jardine’s Lightroom podcasts, but I decided it was worth writing something down for more general consumption and reference.

The Lightroom (née Shadowland) project had at its core the following goals. Some of them existed from the start. Others evolved as we went along. Interestingly, none of them are about photography. Photography proved, however, a good space in which to explore them.

Personality as a conscious part of software design

All products have a personality of one sort or another. That personality is at the heart of how the product works, what it feels like to use, etc. Sometimes that personality is relatively muted and/or buried behind other conventions. Sometimes it is directly in one’s face. Very often it is something that happens more or less by accident, but that accidental nature doesn’t mean that it doesn’t exist.

One of the goals in Lightroom was to consciously think about the product personality we were trying to create with the expectation that a less accidental personality would induce a stronger emotional reaction in users. That stronger reaction can be both positive and negative. We knew that going in. The second part of this goal was to have enough passionate users to outweigh the detractors.

Elegance, Grace, and Style

We wanted Lightroom to seem elegant. To exhibit grace. To show an attention to style beyond the utilitarian aspect that dominated Adobe’s products up to that time. We wanted a richer UI experience.

We’ve been successful in many ways. At the same time, we are painfully aware that there are places where we could be yet more graceful or elegant.

Style is one of the key factors in revealing personality, and as with personality in general, a rich experience will appeal to some and alienate others. Given the number of Lightroom emulations, I see popping up, there’s evidently something appealing about the choices we’ve made.

Maximizing Power v Complexity

While traditional professional applications like Photoshop generally make some effort at coherency in their interfaces, they also tend to be completely ready to add complexity if that will lead to more power. On the other hand, consumer applications frequently throw out power to arrive at simplicity.

On Lightroom, we sought to maximize the power to complexity ratio. If a small bit of additional complexity opened up a lot more power for users, we would go for it. On the other hand, if the complexity was high and the increase in power was low, we would avoid it.

Have we always struck the right balance? No. There are places in the application where the feature set is more complex than the power it delivers merits. Sometimes this happened because we were seeking compatibility with other software. Sometimes this happened because we didn’t come up with an appropriately simple idea. As a demonstration, however, that power need not be complex and that relatively simple software need not be weak, I think Lightroom has generally been a success.

These goals will continue to guide us and photography continues to provide a good space in which to explore them.

Fine Tuning Language

Lightroom 1.2 has support for four languages: English, French, German, and Japanese. With the 1.2 release, English, French, and German are packaged in the same installer. So how do you choose which language Lightroom uses? The answer depends on which operating system you use.

Note: The Japanese release of Lightroom 1.2 uses the same logic as the English, French, and German release, so you can use these same techniques described below with that release.

Windows

On windows, Lightroom bases its language choice off of the “Current Format” selection in the “Regional and Language Options” control panel. Simply select any of the “English”, “French” or “German” language options

If your primary language is not French, German or English, Lightroom on Windows will use English.

If you want to select one language in the “Regional and Language Options” control panel, but prefer to use Lightroom in English, this is possible… but it requires that you modify the Lightroom installation. So proceed with caution:

  1. Open “C:\Program Files\Adobe\Adobe Photoshop Lightroom 1.2” in Windows Explorer.
  2. Create a new folder called “Disabled Languages”
  3. Open the “Resources” folder.
  4. Move “fr” and “de” to the “Disabled Languages” folder.

Now Lightroom will be in English regardless of what language setting you make in the “Regional and Language Options” control panel. To revert this change, move the “fr” and “de” folder back into the Resources folder.

Note: On Windows XP, the control panel is called “Regional and Language Settings” (Microsoft renamed the control panel in Vista).

Macintosh

On a Macintosh computer, you can rank your preferred languages in order by using the International control panel. Drag the language you want to use to the top of the list. Then relaunch Lightroom: The user interface will be presented in that language.

If your primary language is not French, German, or English, Lightroom will scan down the list and use the first language that we support. For example, if your primary language is “Español”, but you also speak French, you can set Lightroom to use French by making sure “Français” appears second in the list of Languages in the International control panel.

If you want your operating system to be French or German, but prefer to use Lightroom in English, this is simple:

  1. Open the /Applications folder in the Finder
  2. Select “Adobe Lightroom.app”
  3. Right click on “Adobe Lightroom.app” and select “Get Info”
  4. Expand the “Languages” tab
  5. Uncheck “de” and “fr”

Now Lightroom will be in English regardless of what language setting you make in the International control panel. To restore the French and German functionality, follow the same steps, except this time check them back on.

Lightroom 1.2 and Camera Raw 4.2 Now Available

Lightroom 1.2 and Camera Raw 4.2 are now available.  Lightroom customers will receive an update notification through Lightroom and Photoshop CS3 users will be able to download the Camera Raw 4.2 update through the Adobe Update Manager. This update also includes the DNG Converter 4.2.  Details as well as direct links for all updates are listed below. 

Regards,
Tom Hogarty

Lightroom and Camera Raw Update Downloads
Lightroom 1.2:         Macintosh   Windows
Camera Raw 4.2:     Macintosh   Windows

Newly Supported Raw File Formats

Canon EOS 40D
Fuji FinePix IS-1
Leaf Aptus 17
Leaf Aptus 54s
Leaf Aptus 75s
Olympus EVOLT E-510
Panasonic DMC-FZ18
Pentax K100D Super
Phase One P 20 +
Phase One P 21 +
Phase One P 25 +
Phase One P 30 +
Phase One P 45 +
Sony Alpha 700

(Unofficial Support will be included for the Canon G9 camera model. ”Unofficial” just means that our engineering and quality engineering team has yet to certify the quality of the support but Lightroom and Camera Raw will read the files)

Camera Raw 4.2 Notes and Corrections:

  • Camera Raw 4.2 does not support the Canon EOS 1D Mark III SRAW format at this time
  • Lightroom and Camera Raw will be updated together to ensure raw format and settings compatibility
  • Noise reduction adjustment for all cameras with Bayer Pattern sensor:  The base point noise reduction applied at the demosaic stage of raw processing has been reduced.  The resulting effect is that images with zero luminance noise reduction applied in Camera Raw 4.2 will contain more noise than the identical settings in Camera Raw 4.1 but less noise than identical settings in Camera Raw 4.0. (This Applies to Lightroom 1.2 as well)

Lightroom 1.2 Notes and Corrections:
Lightroom 1.2 includes corrections for the following issues

  • Lightroom 1.1 catalogs with user-specified sort order could not be imported into another catalog
  • Lightroom 1.1 for Windows could at times display gray boxes instead of image thumbnails
  • Lightroom 1.1 for Windows could at times display gray boxes instead of image thumbnails
  • The preference to write XMP metadata automatically in Lightroom 1.1 could attempt to write metadata indefinitely for offline images causing significant performance problems
  • Images could be dropped from the Quick Collection upon reordering of the source folder
  • Catalogs could not be exported to drives smaller than 250MB
  • The Web Module was not accessible in Lightroom 1.1 on the Macintosh platform when Lightroom was installed on case-sensitive volumes such as the Case Sensitive HFS+ (Journaled) volume
  • Errors occurred exporting to a Linux SMB network volume
  • Scroll position in the grid view was not maintained when changing the view option using the J shortcut key
  • The tokens for image number and image count were not displaying properly in the Slideshow module
  • The metadata panel could display incorrectly on Windows
  • Slideshows on the Macintosh platform did not display properly when a 256MB ATI graphics card was connected to 30 ” LCD
  • The Lightroom 1.1 Web module export did not position the copyright tag in the same location displayed in the preview
  • The auto-eject functionality on Windows ejected the card reader device in addition to the card
  • 1:1 previews were not discarded according to the timing set in the Lightroom preferences
  • 1:1 previews are not built for an entire set of images when requested after import