Camera Raw 7.1 Release Candidate Now Available

Camera Raw 7.1 and DNG Convertor 7.1 Release Candidates are now available on Adobe Labs.  This release includes bug fixes, new camera support, and new lens profiles.  Camera Raw 7.1 Release Candidate includes new Defringe controls to help address chromatic aberration.  Defringe is available as part of the Lens Correction panel.  7.1 Release Candidate can also now read 16-bit, 24-bit, and 32-bit HDR files.  Supported HDR formats are TIFF and DNG.

New Camera Support in Camera Raw 7.1 Release Candidate

  • Canon EOS 1D X
  • Canon EOS 5D Mk III
  • Canon PowerShot G1 X
  • Canon PowerShot S100V
  • Fuji FinePix F505EXR
  • Fuji FinePix F605EXR
  • Fuji FinePix F770EXR
  • Fuji FinePix F775EXR
  • Fuji FinePix HS30EXR
  • Fuji FinePix HS33EXR
  • Fuji FinePix X-S1
  • Nikon D4
  • Nikon D800
  • Nikon D800E
  • Olympus OM-D E-M5
  • Pentax K-01
  • Samsung NX20
  • Samsung NX210
  • Samsung NX1000
  • Sony Alpha NEX-VG20
  • Sony SLT-A57

New Lens Profile Support in Camera Raw 7.1 Release Candidate

Lens Mount Lens Name
Canon Canon EF 35mm f/2
Canon Tokina AT-X 107 AF DX Fish-Eye 10-17mm f/3.5-4.5
Nikon Nikon AF-S Micro Nikkor 60mm f/2.8G ED
Nikon Nikon AF Micro-Nikkor 60mm f/2.8D
Nikon Tokina AT-X 107 AF DX Fish-Eye 10-17mm f/3.5-4.5


Camera Raw 7.1 Release Candidate Notes

These items have been FIXED in Camera Raw 7.1 Release Candidate:

  • Keyboard shortcuts for the point curve channel on Windows were not functional
  • Local corrections are not refreshing after applying lens corrections.  This occurs on both TIFF and JPEG files with noise reduction disabled.
  • Point curve adjustments made to a single R,G, or B channels in the Tone Curve tab can be reset a channel curve is adjusted.
  • Photoshop CS5 and Bridge show different values for the image resolution in certain images.  Photoshop and Bridge are not changing the image resolution, but displaying different values.
  • Applying keywords to multiple files can sometimes cause errors when writing the keyword metadata to file.  This can occur when the “Save Image Settings in” preference within Camera Raw is set to the Camera Raw database.

Thank You

Adobe Camera Raw 6.7 and DNG Convertor 6.7 Now Available on Adobe.com

Camera Raw 6.7 [Win|Mac] and DNG Convertor 6.7 [Win|Mac] are now available as a final releases on Adobe.com and through the update mechanisms available in Photoshop CS5.  This release includes bug fixes, new camera support, and new lens profiles.

Please note that this will be the last update of Camera Raw for Photoshop CS5.

New Camera Support in Camera Raw 6.7

  • Canon EOS 1D X
  • Canon EOS 5D Mk III
  • Canon PowerShot G1 X
  • Canon PowerShot S100V
  • Fuji FinePix F505EXR
  • Fuji FinePix F605EXR
  • Fuji FinePix F770EXR
  • Fuji FinePix F775EXR
  • Fuji FinePix HS30EXR
  • Fuji FinePix HS33EXR
  • Fuji FinePix X-S1
  • Nikon D4
  • Nikon D800
  • Nikon D800E
  • Olympus OM-D E-M5
  • Pentax K-01
  • Samsung NX20
  • Samsung NX210
  • Samsung NX1000
  • Sony Alpha NEX-VG20
  • Sony SLT-A57

New Lens Profile Support in Camera Raw 6.7

Lens Mount Lens Name
Canon Tokina AT-X 124 AF PRO DX 12-24mm f/4 (IF)
Canon Tokina AT-X 124 AF PRO DX II 12-24mm f/4 (IF)
Canon Tokina AT-X 165 PRO DX 16-50mm f/2.8 (IF) ASPHERICAL
Canon Tokina AT-X 535 PRO DX  50-135mm f/2.8 (IF)
Canon Tokina AT-X M35 PRO DX 35mm f/2.8 Macro
Canon Tokina AT-X M100 AF PRO D 100mm f/2.8 Macro
Canon Tokina AT-X 116 PRO DX 11-16mm f/2.8
Canon Zeiss Distagon T* 2,8/15mm ZE
Nikon Tokina AT-X 124 AF PRO DX 12-24mm f/4 (IF)
Nikon Tokina AT-X 124 AF PRO DX II 12-24mm f/4 (IF)
Nikon Tokina AT-X 165 PRO DX 16-50mm f/2.8 (IF) ASPHERICAL
Nikon Tokina AT-X 535 PRO DX  50-135mm f/2.8 (IF)
Nikon Tokina AT-X M35 PRO DX 35mm f/2.8 Macro
Nikon Tokina AT-X M100 AF PRO D 100mm f/2.8 Macro
Nikon Tokina AT-X 116 PRO DX 11-16mm f/2.8
Nikon Nikon AF-S NIKKOR 85mm f/1.8G
Nikon Nikon Micro-Nikkor 60mm f/2.8D
Nikon Nikon 1 Nikkor VR 30-110mm f/3.8-5.6
Nikon Sigma 18-200mm F3.5-6.3 II DC OS HSM
Nikon Zeiss Distagon T* 2,8/15mm ZF.2
Leica LEICA APO-SUMMICRON-M 75 mm f/2 ASPH.
Leica LEICA APO-SUMMICRON-M 90 mm f/2 ASPH.
Leica LEICA APO-TELYT-M 135 mm f/3.4 ASPH.
Leica LEICA ELMAR-M 24 mm f/3.8 ASPH.
Leica LEICA ELMARIT-M 28 mm f/2.8 ASPH.
Leica LEICA ELMARIT-M 90 mm f/2.8
Leica LEICA MACRO-ELMAR-M 90 mm f/4
Leica LEICA NOCTILUX-M 50 mm f/0.95 ASPH.
Leica LEICA SUMMARIT-M 35 mm f/2.5
Leica LEICA SUMMARIT-M 50 mm f/2.5
Leica LEICA SUMMARIT-M 75 mm f/2.5
Leica LEICA SUMMARIT-M 90 mm f/2.5
Leica LEICA SUMMICRON-M 28 mm f/2 ASPH.
Leica LEICA SUMMICRON-M 35 mm f/2 ASPH.
Leica LEICA SUMMICRON-M 50 mm f/2
Leica LEICA SUMMILUX-M 21 mm f/1.4 ASPH.
Leica LEICA SUMMILUX-M 24 mm f/1.4 ASPH.
Leica LEICA SUMMILUX-M 35 mm f/1.4 ASPH.
Leica LEICA SUMMILUX-M 50 mm f/1.4 ASPH.
Leica LEICA SUPER-ELMAR-M 18 mm f/3.8 ASPH.
Leica LEICA SUPER-ELMAR-M 21 mm f/3.4 ASPH.
Pentax Sigma 17-50mm F2.8 EX DC HSM
Pentax Sigma 50-200mm F4-5.6 DC HSM
Sony Tokina AT-X 116 PRO DX 11-16mm f/2.8
Sony Tamron 18-200mm F/3.5-6.3 Di III VC B011
Sony Sigma 17-50mm F2.8 EX DC HSM
Sony Sigma 50-200mm F4-5.6 DC HSM
Sigma Sigma 18-200mm F3.5-6.3 II DC OS HSM

Camera Raw 6.7 Release Notes

These items have been FIXED in Camera Raw 6.7:

  • Black halo/speckle artifacts could appear when performing an image warp.  Examples of warps include lens profile adjustments and rotating the image.
  • Files rendered in Lightroom 4.0 appeared differently in ACR 6.7.
  • Using the clarity adjustment adds tone to 100% white tones
  • Raw files from Olympus E-P1 are not cropped according to the aspect ratio set on the camera
  • Nikon D800, D800E and D4 NEF still images will not open in Lightroom 4.0 and ACR 6.7 if they were shot in live video mode
  • Rendering with local corrections in 6.5 and 6.6 could be slower compared to previous ACR 6 versions
  • Saving over 200 images as compressed tiff can cause certain hardware to become unresponsive.

Thank You

Thanks to everyone who submitted bug reports, posted entries in the U2U forums and blogged their issues so that we could improve Camera Raw and DNG Convertor in this update.

Lightroom 4.1 RC2 Now Available on Adobe Labs

Lightroom 4.1 is now available as Release Candidate 2 on Adobe Labs.   The ‘release candidate’ label indicates that this update is well tested but would benefit from additional community testing before it is distributed automatically to all of our customers.  The final release of Lightroom 4.1 may have additional corrections or camera support.

Bugs Corrected in Lightroom 4.1 Release Candidates

The following bugs that were part the Lightroom 4 releases have been corrected. The team appreciates the very detailed feedback the community has provided on Lightroom 4 and we’re excited to correct a number of issues experienced by our customers. These issues have been FIXED:

  • Estimated price does not update when switching between books in the Collection panel.
  • Postscript Type 1 Fonts do not appear in the Font menu within the Book module.
  • Filenames can now be used as auto text captions within the Book module.
  • Fonts such as Courier New and Times were not displaying properly on books exported as PDF files.
  • The Adjustment Brush pin would not properly accept negative values.
  • Clarity adds grey tinting to 100% white tones.
  • Creating a soft proof does not add a line item to the History Panel.
  • Altitude will now be populated on geotagged photos.
  • Unable to import RAW+JPEG files directly from Canon 5D, Canon 5D Mark II, Nikon D700, Nikon D90, and Sony NEX5 cameras when connected through USB.
  • Unable to import both RAW + JPEG files when using the built-in SD card reader on Macbook laptops.
  • Lightroom 4 and ACR 6.7 could render files differently.

The following issues were fixed in Lightroom 4.1 release candidate 1 (March 29, 2012):

  • Point Curve adjustments made in Lightroom 3 and before have been restored.
  • Lightroom 4 did not properly open external applications when using the “Edit In” functionality.
  • Addressed performance issues in Lightroom 4, particularly when loading GPS track logs, using a secondary monitor, and the controls within the Develop module.
  • Ability to update DNG previews and metadata for more than 100 photos has been restored.
  • This update allows for improved viewing of subfolders and stacks in folders with a large number of photos.
  • It was possible that a layout of a saved book could be lost after quitting Lightroom 4.
  • Please provide feedback on your experience with the Lightroom 4.1 Release Candidate in our Feedback Portal.

New Camera Support in Lightroom 4.1 Release Candidates

  • Canon EOS 5D Mark III*
  • Canon EOS 60Da
  • Fuji FinePix F770EXR
  • Fuji FinePix F775EXR
  • Nikon D3200
  • Olympus OM-D E-5M
  • Panasonic Lumix DMC-GF5
  • Pentax K-01
  • RICOH LENS A16 24-85mm F3.5-5.5
  • Samsung NX20
  • Samsung NX210
  • Samsung NX1000
  • Sony Alpha NEX-VG20
  • Sony SLT-A57

*Support for the 5D Mark III was also included in the first Lightroom 4.1 Release Candidate

NOTE: The Lightroom and Camera Raw team is well aware of the new X-Pro1 camera from FUJIFILM.  We are currently developing raw support for the X-Pro1 and look forward to providing it as soon as support is complete.  Thanks for your patience on this topic.

Release Notes

  • Lightroom 4.1 RC2 now includes the ability to process HDR TIFF files.  (16, 24 or 32-bit TIFF files)  This can be quite useful if you have merged multiple exposures into a single 32-bit image using Photoshop’s HDR Pro.  Using the new basic panel controls can be a very effective and straightforward method of achieving an overall balance across the tonal range.
  • Additional Color Fringing corrections have been added to Lightroom 4.1 RC2.  Please see this blog post for additional details.

Thank You

A big thanks to everyone who submitted bug reports, posted entries in the U2U forums and blogged their issues so that we could improve the Lightroom 4 experience in this update.

New Color Fringe Correction Controls

One of the new enhancements to Lightroom 4.1 RC2 is the addition of new color fringe correction controls. What exactly is a color fringe correction? This blog post is intended to explain the problem and the solution we’ve provided in Lightroom 4.1.(For ACR customers it will also be included an upcoming version of ACR7 for Photoshop CS6, currently available as a public beta)

The content in this post has been written by Eric Chan, the developer primarily responsible for implementing the solution. (Photos have been attributed where requested.)

Overview

Red-green and blue-yellow fringes at the image periphery result from lateral chromatic aberration. This problem is relatively easy to fix, and ACR & LR already have tools to do so. On the other hand, purple and green fringes in out-of-focus areas and along high-contrast boundaries are much more problematic. These fringes result from axial chromatic aberration (wavelength-dependent focus shift), aberrations in sensor microlenses, and flare. In most cases, purple fringes appear in front of the plane of focus, and green fringes appear behind the plane of focus. The aberrations can happen anywhere in the image, not just the image periphery. Sometimes, they are so strong that they’re easily spotted in small previews, such as proxies and thumbnails (thus, not only visible at 100% pixel view!). Axial CA affects nearly all lenses, from inexpensive cell phone lenses to very expensive top-of-the-line lenses. It is particularly pronounced with fast lenses at wide apertures. Hence, an improved defringe control should appeal to photographers shooting portraits, events, weddings, sports, etc. — anytime that high-speed lenses are used.

Example

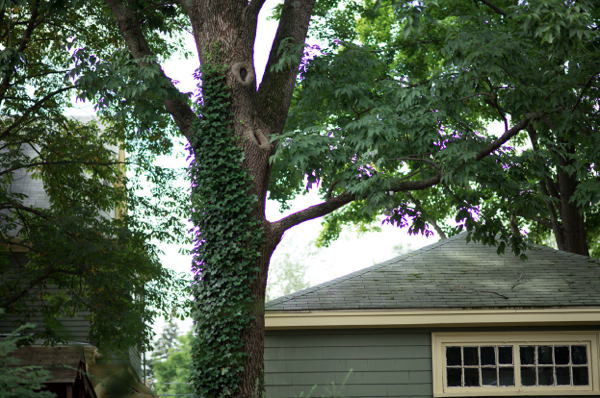
Example 1: Backyard
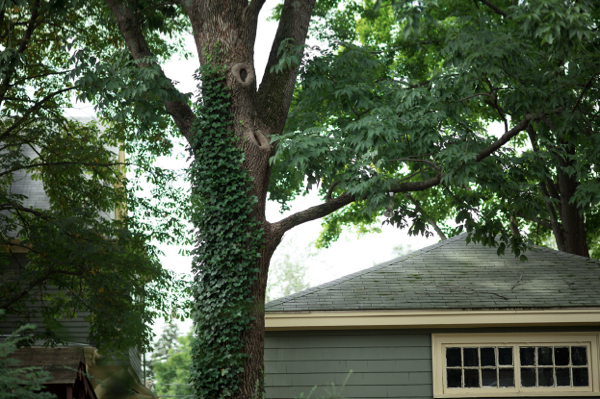
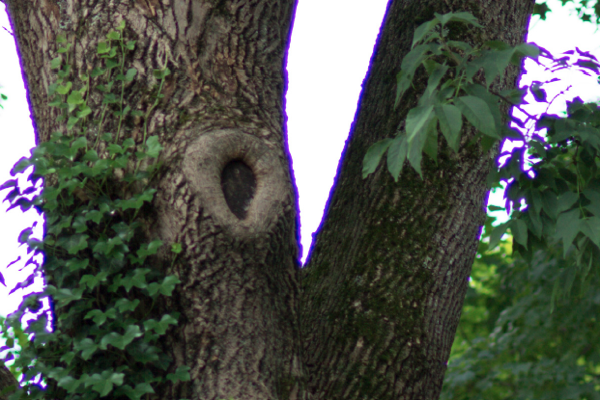
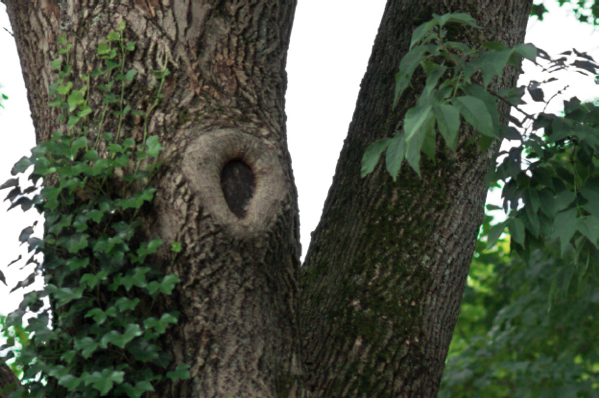
The branches and leaves have very strong purple fringing, visible even in the small overview image.Overview, original: Screen Shot 2012 04 25 at 3 01 20 PMOverview, with defringe: Screen Shot 2012 04 25 at 3 01 29 PMCloseup, original: Screen Shot 2012 04 25 at 3 01 40 PMCloseup, with defringe: Screen Shot 2012 04 25 at 3 01 50 PM
Color Fringing Defined

Types of Fringing

  • Color fringing (usually visible on high-contrast edges in the image) can result from several physical phenomena:
    1. Lateral (transverse) chromatic aberration (red/green fringes, blue/yellow fringes),
    2. Axial (longitudinal) chromatic aberration (purple and green fringes),
    3. Flare due to lens-lens and sensor-lens reflections (ghost images), and
    4. Charge leakage in CCD sensors (thin purple fringes).
  • Adobe’s existing “Remove Chromatic Aberration” checkbox (introduced in Camera Raw 7.0 and Lightroom 4.0), and its predecessors (Profile-based “Chromatic Aberration” slider, and manual Chromatic Aberration sliders) handles issue #1 (lateral CA) only.
  • The previous Defringe popup menu (Off / Highlight Edges / All Edges) in Camera Raw 7.0 and Lightroom 4.0 handles issue #4 (CCD charge leakage) only.
  • Up till now, Adobe did not have solutions for problems #2 (axial CA) and #3 (flare).

Notes on Axial (Longitudinal) CA

The new Defringe controls are designed to fix axial (longitudinal) CA, color aberrations due to ghosting or flare, and color aberrations (thin fringes) due to charge leakage, which affects some CCD sensors.  Here’s some context on axial/longitudinal CA:

  • It can happen anywhere in the image (not just image borders).
  • It affects nearly all “fast” (wide aperture) lenses, typically most visible at the wider apertures (e.g., f/1.4 thru f/2.8).
  • Fringes become less visible as you stop down the lens (e.g., more visible at f/2, less visible at f/8).
  • Fringes are usually most visible just in front of or just behind the plane of focus.
  • Fringes typically appear purple/magenta when they’re in front of the plane of focus, and appear green when they’re behind the plane
  • of focus.
  • Even at the plane of focus, high-contrast edges (especially backlit) may show purple fringes due to flare.

How to use the new Defringe Controls

Slider Overview

There are 4 sliders:

  • Two amount sliders (Purple Amount, Green Amount). These are normal sliders.
  • Two hue sliders (Purple Hue, Green Hue). These are “split” sliders.

The two “Purple” controls are intended to be used to remove purple fringing (regardless of the cause).

The “Purple Amount” slider determines the strength of the purple fringe removal. The range is 0 to 20, with default 0 (which means disabled). Higher values mean stronger correction, but may also negatively impact colors of real purple objects in your image. Note that fringe removal is limited to the hue range defined by the Purple Hue slider (see below).The “Purple Hue” slider determines the range of hues removed. This control has two knobs, which determine the endpoints of the hue range.

  • Click-and-drag either knob to adjust one endpoint at a time.
  • Click-and-drag the central bar (the part of the slider between the two knobs) to move both endpoints at the same time.
  • Double-click a knob to reset its value to the default.
  • Double-click the central bar to reset both endpoints to the default.
  • The minimum spacing between the endpoints is 10 units. Hence, dragging the left knob too close to the right knob will cause the right knob to move automatically, to preserve the minimum spacing of 10 units.

The Green Amount and Green Hue sliders work similarly for green fringes. However, the default range for the Green Hue slider is 40 to 60 (narrower range) instead of 30 to 70. This is to help protect common green and yellow colors (e.g., foliage) by default.

These controls are best used when viewing an image closely (e.g., 100% or higher).

Option-Key Feedback (Visualization) for Global Controls

Alt/Option-key visualization is available for all 4 controls. I highly recommend using these visualizations to help set the slider values appropriately:

Option-key + click-and-drag on the Purple Amount slider to visualize purple fringe removal. The preview window shows only the affected areas of the image (all other areas will be shown as white). This lets you concentrate on the affected areas and verify that the purple fringe color gets removed.

Option-key + click-and-drag on the Purple Hue slider (either knob, or the central bar) to visualize the range of hues to be defringed. The preview window “blacks out” the affected hue range. Pay attention to the borders of the “blacked out” area and check if there are any residual purple/magenta colors.

Works similarly for the Green Amount and Green Hue sliders.

Description of Eyedropper Tool

The 4 global Defringe controls above are powerful, but new users may find them tricky to learn. For this reason, there is an “eyedropper”tool so that users can click directly on the image to help set the appropriate parameters.

Using the eyedropper for Defringe is similar to using the eyedropper to using the White Balance selection eyedropper: when you’re in the LensCorrections -> Color tab (so that the Defringe controls are visible), select the eyedropper and click on a fringe in the image.  It helps to be zoomed in (e.g., 200% or even 400%) to facilitate accurate color picking.
Clicking on a pixel will cause the Defringe system to perform a local analysis of the pixels in the neighborhood, resulting in one of the following 3 outcomes:

  • It determines that you clicked on a purple fringe, and it  automatically adjusts both the Purple Amount and Purple Hue  sliders.
  • It determines that you clicked on a green fringe, and it  automatically adjusts both the Green Amount and Green Hue sliders.
  • It determines that you clicked on an area that was too neutral or outside the supported color range (e.g., all white or gray area or an orange color) and reports an error message.

While moving the eyedropper tool over the image, you will see the eyedropper icon change to purple or green and the Purple Hue or Green Hue slider highlighting.  This shows approximately what hue you’re currently targeting, and which of the two fringe colors (purple or green) would be adjusted if you were to click.

Press ESC or Return/Enter to dismiss the eyedropper sampling window once you have done with the selecting the purple and green fringe colors.

Description of Local Defringe Control

The global Defringe control is sufficient in many cases, but sometimeslocal refinement is required. One reason is the need to “protect”certain scene colors (prevent them from being defringed). Another reason is to help suppress some minor residual fringing in aparticular area. For these reasons, Defringe is also available as a local adjustment.
Details:

  • Available as a brush or gradient (as with all our local adjustment channels).
  • Only available in PV 2012.
  • Standard range is -100 to +100, default 0.
  • Minus direction (towards -100) means “do not apply defringe to the affected area.” This is a way for the user to “protect” certain image areas from being incorrectly defringed. For    example, applying a strong purple fringe removal may indeed effectively remove those fringes, but it may also desaturate or otherwise (undesirably) alter edges of purple objects in your    picture. Painting with Defringe -100 over those areas will completely protect them and keep them at their original color.
  • Positive direction (towards +100) means “apply additional defringing to the affected area.” This is a way for the customer to fine-tune and take care of small problem areas.
  • For images that have only limited color fringe problems in a specific area, it may actually be easier (both faster and safer) to use the local Defringe control.
  • Note that local +Defringe will remove fringes of all colors (not just purple and green) and hence is independent of the global Purple Hue and Green Hue settings.
  • The maximum strength of local +Defringe is limited (not nearly as strong as global defringe), so for extreme cases you will need to use the global Defringe instead. (In general, I       recommend using global Defringe first anyways, then following up local Defringe if needed.)

Suggested Workflow

1. Do overall color and tone corrections first (e.g., Basic panel, Tone Curve panel, etc.).
2. Turn on profile-based lens corrections (for distortion and vignetting), if needed.
3. Turn on lateral CA correction (check the “Remove Chromatic Aberration” box), if needed.
4. Apply global Defringe, if needed.
5. Apply local Defringe, if needed.

Additional Examples

Example 2: Cake 
I focused in the middle of the letters on the cake. The letters in front have purple fringes (“Meghna”), and the letters in back have green fringes (“Happy”), with some alternating green-magenta bands. These are typical symptoms of axial chromatic aberration. With the new defringe filter, the purple and green fringes are largely reduced. Note that this is not a straightforward desaturation (which would turn the letters and cake gray).

Overview of image: Screen Shot 2012 04 25 at 2 49 03 PM

Closeup, original: Screen Shot 2012 04 25 at 2 49 16 PM
Closeup, with defringe: Screen Shot 2012 04 25 at 2 49 25 PM
Example 3: Champagne
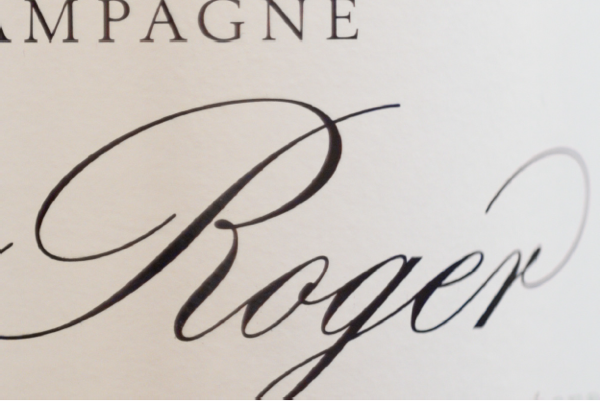
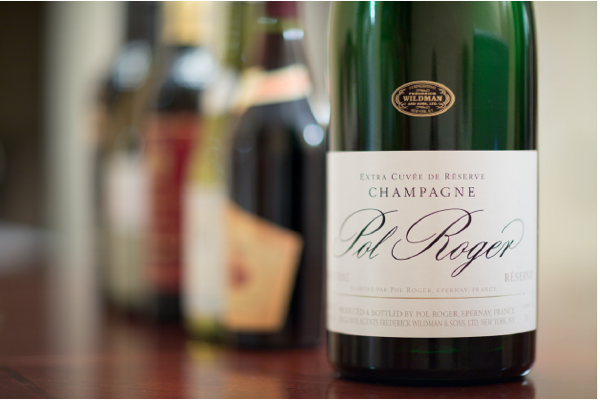
Similar situation. The closeup shows mild purple fringing on the closer letters, and much stronger green fringing on the letters around the side of the bottle (just behind the plane of focus). Also, the circular out-of-focus highlights in the background have a green outline. These issues are largely reduced with the new defringe filter.
Overview, original (color fringing on bottle letters slightly visible even at this size): Screen Shot 2012 04 25 at 2 57 45 PMCloseup, original: Screen Shot 2012 04 25 at 2 57 54 PMCloseup, with defringe: Screen Shot 2012 04 25 at 2 58 08 PMCloseup #2, original: Screen Shot 2012 04 25 at 2 58 24 PMCloseup #2, with defringe: Screen Shot 2012 04 25 at 2 58 33 PM
Example 4: Water 
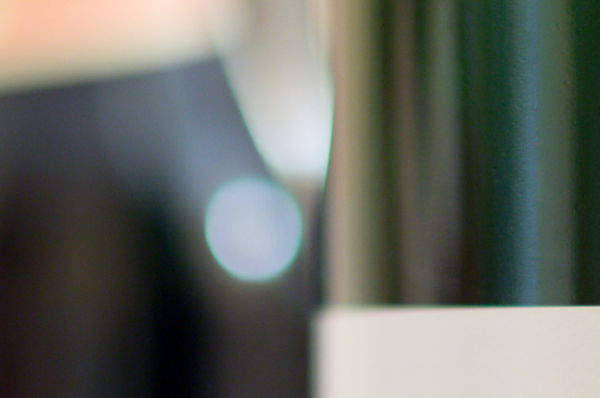
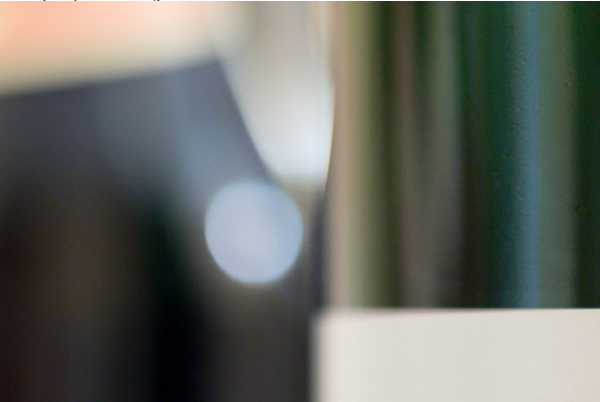
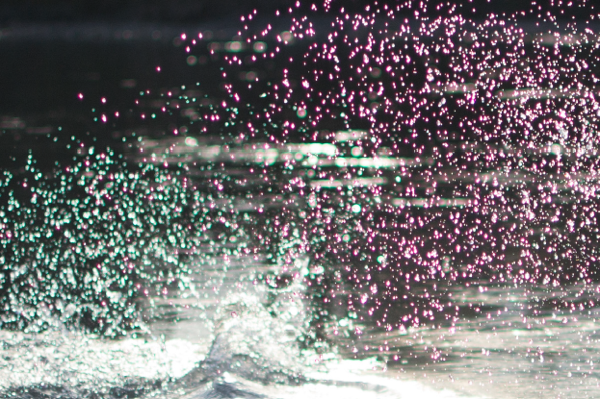
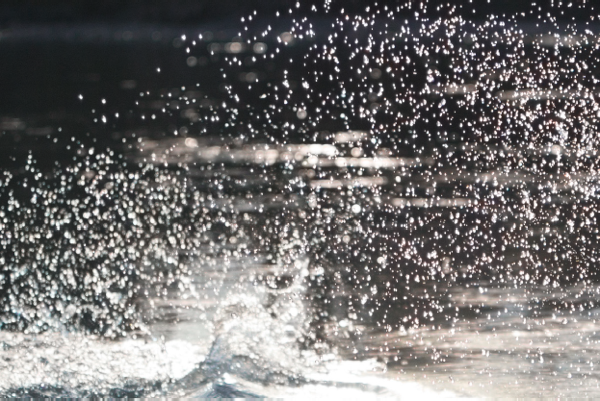
The water spray shows very strong green and purple fringes, even in the small overview image — yikes! The foreground elements (such as the railing) also show purple fringes, since they’re in front of the plane of focus.  Special thanks Stanislas Chevallier for providing our engineering team with this example and providing us with permission to post the image here.  His work can be found on Flickr: http://flickr.com/chegayvara

Overview, original: Screen Shot 2012 04 25 at 3 03 48 PMOverview, with defringe: Screen Shot 2012 04 25 at 3 03 57 PMCloseup #1, original: Screen Shot 2012 04 25 at 3 04 06 PMCloseup #1, with defringe:
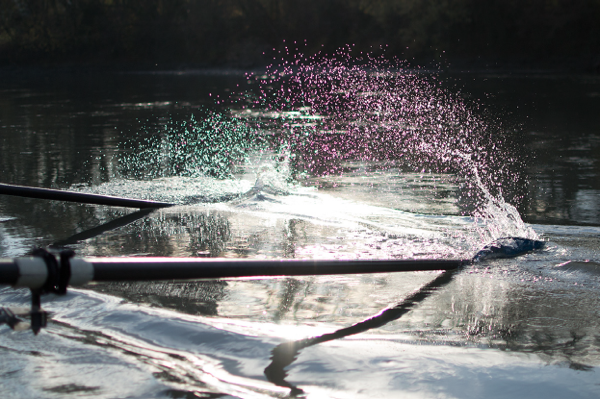
Screen Shot 2012 04 25 at 3 04 14 PM

Closeup #2, original: Screen Shot 2012 04 25 at 3 04 23 PMCloseup #2, with defringe: Screen Shot 2012 04 25 at 3 04 30 PMExample 5: Boy
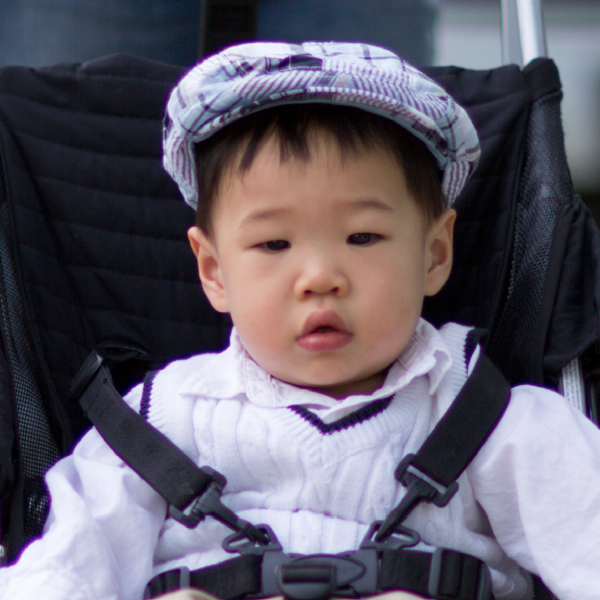
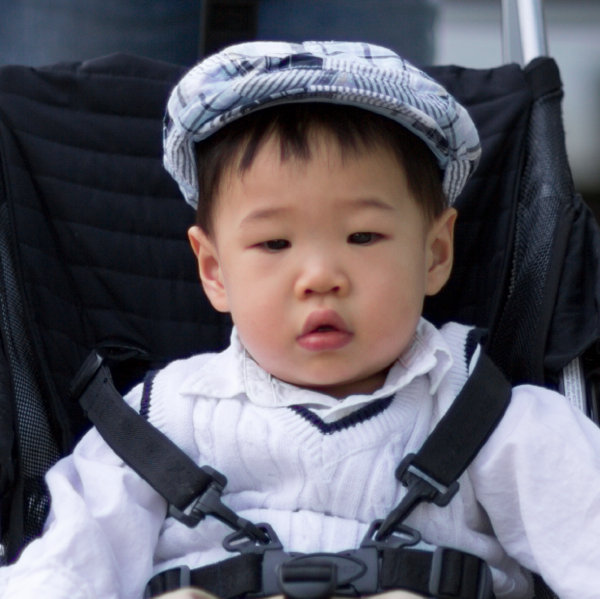
There is visible purple fringing on his hat and shirt. He may have the blues, but he shouldn’t have the purples. 😉 There is also green fringing on the highlights of the car in the background.Overview, original: Screen Shot 2012 04 25 at 3 16 35 PM
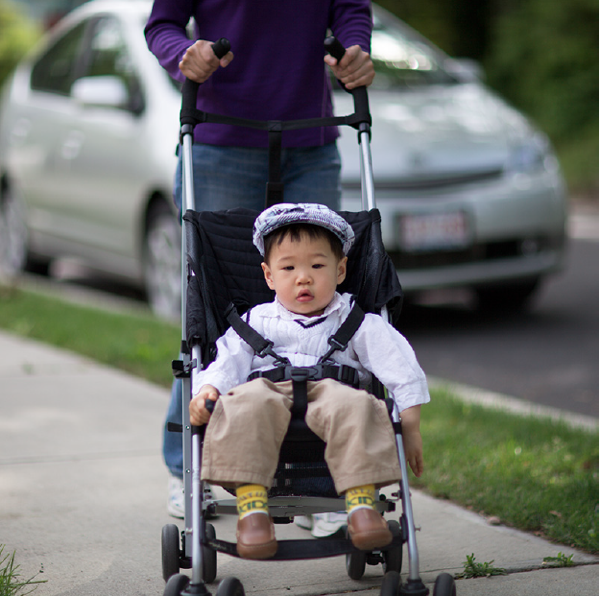
Closeup, original: Screen Shot 2012 04 25 at 3 16 43 PMCloseup, with defringe: Screen Shot 2012 04 25 at 3 16 52 PMCloseup #2, original: Screen Shot 2012 04 25 at 3 17 02 PMCloseup #2, with defringe: Screen Shot 2012 04 25 at 3 17 12 PM


Updating Develop Presets for Lightroom 4

If you’ve upgraded to Adobe Photoshop Lightroom 4 from previous versions of Lightroom, you may have noticed that some of your Develop Presets might create a different look in LR4 than you saw in LR3.  We revamped our image processing algorithm in Lightroom 4.  In particular, presets that include adjustments to any of the following attributes will likely give you different results in LR4:

  • Exposure
  • Brightness
  • Contrast
  • Fill Light
  • Highlight Recovery
  • Black Clipping
  • Clarity
  • Tone Curve

Before you begin, we recommend making a back-up of your existing Develop Presets.  The easiest way to do so is by going to Preferences > Presets > Location and clicking the “Show Lightroom Presets Folder.”  Make a copy of this folder in Windows Explorer (Windows) or Finder (Mac) and save it someplace safe.

For user-created PRE-Lr4 Develop Presets that contain settings for any of the attributes listed above, the easiest way to insure that the look and intent of the Develop Preset is maintained is by saving them with their Process Version included.

  1. Select an image and go to the Develop Module in Lightroom 4.
  2. Set the Process Version to 2010.  This is in the Camera Calibration panel on the lower right hand side.
  3. Select the appropriate Develop Preset created in Lightroom 3 or earlier
  4. Select the “+” button in the Preset Panel.  This allows you to save the current settings as a new Preset.  Make sure that the “Process Version” checkbox is checked.
  5. Hit the Save button.  We recommend creating a specific folder for Lightroom 3 presets that you update in this fashion.
  6. Now your LR3 preset will create the same results in Lightroom 4.

You can also recreate your Develop Presets in order to take full advantage of PV2012, the revamped image processing algorithm in Lightroom 4.  You can do this by:

  1. Select an image and go into the Develop Module in Lightroom 4
  2. Select the appropriate Develop Preset created in Lightroom 3 or earlier.
  3. Set the Process Version to 2012. This is in the Camera Calibration panel on the lower right hand
  4. Review the image and make adjustments until the image meets your visual expectation for the Preset.  Please note that some images might require significant tweaking at this step.
  5. Save the Preset with a new name.

Lightroom 4.1 Now Available on Adobe Labs

Lightroom 4.1 is now available as Release Candidates on Adobe Labs.   The ‘release candidate’ label indicates that this update is well tested but would benefit from additional community testing before it is distributed automatically to all of our customers.  The final release of Lightroom 4.1 may have additional corrections or camera support.

Bugs Corrected in Lightroom 4.1 Release Candidate

The following bugs that were part the Lightroom 4 releases have been corrected. The team appreciates the very detailed feedback the community has provided on Lightroom 4 and we’re excited to correct a number of issues experienced by our customers. These issues have been FIXED:

  • Point Curve adjustments made in Lightroom 3 and before have been restored.
  • Lightroom 4 did not properly open external applications when using the “Edit In” functionality.
  • Addressed performance issues in Lightroom 4, particularly when loading GPS track logs, using a secondary monitor, and the controls within the Develop module.
  • Ability to update DNG previews and metadata for more than 100 photos has been restored.
  • This update allows for improved viewing of subfolders and stacks in folders with a large number of photos.
  • It was possible that a layout of a saved book could be lost after quitting Lightroom 4.
  • Please provide feedback on your experience with the Lightroom 4.1 Release Candidate in our Feedback Portal.

New Camera Support in Lightroom 4.1 Release Candidate

  • Canon EOS 5D Mk III

Thank You

A big thanks to everyone who submitted bug reports, posted entries in the U2U forums and blogged their issues so that we could improve the Lightroom 4 experience in this update.

Raw support in Lightroom and Camera Raw

There have been a number of questions around raw support for Lightroom and the Camera Raw plug-in.(ACR) Below is a list of new support by version. (Skip the background if you just need to know if your camera is supported)

Background
It’s a busy time of year for the team as we just released Lightroom 4, the Photoshop CS6 beta was introduced last week and some of the new flagship cameras are beginning to have broader availability.  Our consistent goal is to provide new camera support as quickly as possible.  We also try to keep it simple by aligning Lightroom and ACR updates both in terms of timing and camera support.  However for the few months around the launch of Lightroom 4 and Photoshop CS6, we forfeited alignment in favor of getting support out as quickly as possible.  That’s why the ACR6.7 release candidate supports the 5D Mk III but the Lightroom 4.0 release does not.   You’ll also note that ACR7 available with Photoshop CS6 beta, is lagging the most in updated camera support.  This is based on when we lock down or “bake” the code for each release.   Even though ACR7 was only released last week it was “baked” before Lightroom 4.0 and Camera Raw 6.7.  Similarly, Lightroom 4.0 was finalized before Camera Raw 6.7.  We’ll get Lightroom and Camera Raw in sync soon but in the interim, here’s the latest incremental support list for each product, relative to Camera Raw 6.6 and Lightroom 3.6:

Photoshop CS6 beta with ACR7

  • Canon PowerShot S100V
  • Fuji FinePix X-S1

Lightroom 4.0

  • Canon EOS 1D X
  • Canon PowerShot G1 X
  • Canon PowerShot S100V
  • Fuji FinePix F505EXR
  • Fuji FinePix F605EXR
  • Fuji FinePix HS30EXR
  • Fuji FinePix HS33EXR
  • Fuji FinePix X-S1
  • Nikon D4
  • Nikon D800
  • Nikon D800E

Photoshop CS5 with ACR6.7 (Release Candidate) and Lightroom 4.1 Release Candidate

  • Canon EOS 1D X
  • Canon EOS 5D Mk III
  • Canon PowerShot G1 X
  • Canon PowerShot S100V
  • Fuji FinePix F505EXR
  • Fuji FinePix F605EXR
  • Fuji FinePix HS30EXR
  • Fuji FinePix HS33EXR
  • Fuji FinePix X-S1
  • Nikon D4
  • Nikon D800
  • Nikon D800E

Additional Notes:

  • If you need access to the latest camera support and your current Adobe product does not have support, the DNG Converter 6.7 is a free application that will convert that latest camera support above from a proprietary format to the DNG format that can be read in earlier versions of Adobe’s products. (The DNG Converter is the second option on the download page of the 6.7 release candidate site)
  • For those that have been asking, Canon EOS 5D Mk III support will be added to the next update to Lightroom this week.
  • Lightroom 3.6 is the last update to Lightroom 3.  New camera support will only be added to Lightroom 4 going forward.
  • And yes, we are aware of the existence of the Fuji X-Pro1 camera and like all new camera models we are working to add support as quickly as possible.

Thanks for everyone’s patience and support during a busy and exciting season for new cameras and software.

Lightroom 4 Hot Issues

Update – Lightroom 4.1 Release Candidate is now available and helps address many of the concerns listed here.  Please visit http://labs.adobe.com/technologies/lightroom4-1/ to download and install Lightroom 4.1 RC.


The team would like to provide an update on several issues discovered since last Monday night’s launch. Thanks for your patience while we investigated and compiled this list.  

Point Tone Curve Migration
In Lightroom 3, the Tone Curve panel added a “point curve” adjustment option in addition to the default parametric curve.  When a customer upgrades their Lightroom 3 catalog to Lightroom 4, any images with point curve adjustments will lose those specific settings.  This is a high severity bug and we are working hard to provide a solution as quickly as possible.  Several members of the community have already started helping us test a fix that can be applied to an upgraded Lightroom 4 catalog.  We’ll be providing updates via this blog and the following Lightroom Feedback thread.

“Edit in” Workflow for External Editors/Plug-ins
There is a bug on both Mac and Windows that can cause the “Edit in…” workflow to fail for third party applications and plug-ins.  Many of our customers working with Nik plug-ins have found that they’re unable to launch their plug-ins from within Lightroom 4. (This is more prevalent on Windows)  We are testing a solution for this problem and it will be included in our next update.  Feedback on this bug is captured here.

Edit in Photoshop Workflow
Currently, the Edit in Photoshop workflow asks that you have the Camera Raw 7 plug-in installed.  Please note that the Camera Raw 7 plug-in is not available at this time.  The correct plug-in for Lightroom 4 and Photoshop CS5 compatibility is Camera Raw 6.7, currently available on Adobe Labs Please keep in mind that currently Camera Raw 6.7 is a a Release Candidate version of the plug-in. A “release candidate” label indicates that this update is well tested but would benefit from additional community testing before it is distributed automatically to all of our customers.

Reverse Geocoding Delays
We had a temporary loss of reverse geocoding results on Tuesday.  This problem has been resolved and we’re monitoring the issue with Google’s help.

Serial Number Delivery from Adobe.com Store
A small group of customers that ordered Lightroom 4 as a software download(not a boxed copy) on Tuesday or Wednesday did not receive serial numbers.  We’ve corrected the error and we’ll be monitoring this issue going forward.  If you’re included in that group and have not received a serial number yet, please contact Jeff Tranberry, our Chief Customer Advocate, with your order number and any support case numbers you have.

Upgrade Details
We’ve had several questions around who is eligible for an upgrade to Lightroom 4.  Any Lightroom 1, 2 or 3 version of Lightroom, education editions included, can utilize the upgrade version of Lightroom 4.  The prior version of Lightroom does not need to be installed on the computer, however you will need the prior version serial number at the time of installation of Lightroom 4. (If the prior version is still installed on the computer, Lightroom 4 will automatically pick up that serial number so you don’t need to go digging through boxes or your email)

Upgrade policy for those that just purchased LIghtroom 3
We’ve seen quite a few questions from those who have just purchased Lightroom 3.  If you purchased Lightroom 3 very recently you may be eligible for a complimentary upgrade to Lightroom 4: http://www.adobe.com/go/pa 

We’re listening
If you have additional workflow or how-to questions visit our user community on Adobe.com: http://forums.adobe.com/community/lightroom

To report Issues or Ideas on how to improve Lightroom, visit our Feedback Site on Photoshop.com: http://feedback.photoshop.com/

What happened to Fill Light and Recovery?

Recovery and Fill Light are popular and powerful tools. However, they also have some limitations. For example, Recovery can result in muddy highlights, and Fill Light can lead to visible halos at high-contrast boundaries. Furthermore, it is difficult to transfer the technology behind these controls to local adjustments.

With Process Version 2012 in Lightroom 4, we have introduced a new set of Basic tone controls that overcomes these limitations and results in much higher image quality. For example, the Highlights and Shadows tools are optimized for very high contrast images, produce much smoother highlight and shadow gradations, are available as local adjustments, and minimize halo artifacts.

We recommend starting at the top of the Basic panel and working down through the controls. Start with the Exposure and Contrast controls to set the overall desired image brightness and contrast. Proceed to the Highlight and Shadow controls, using them to establish the relationship of the highlights and shadows in your image to the midtones. If needed, fine-tune your image’s tonal end points using the Blacks and Whites sliders.  Note that Exposure, Contrast, Highlights, and Shadows are also available as local adjustments.

There is a bit of a relearning process, but once you have become used to the new controls we think that you’ll love them.  Of course,  you still have access to Fill Light and Recovery if you so choose by changing the Process Version to PV2010 in the Camera Calibration panel on the bottom right hand side.

Lightroom 4.0 Resources

Lightroom 4 is out and we’re compiling a list of online resources dedicated to educating photographers on Lightroom 4.  Adobe maintains an official YouTube channel with many great videos and tutorials, but its often helpful to get additional perspectives.  Please submit additional content through the comments section and we’ll add them to the list.