Eric Scouten
So you want to make sure you’ve identified all of the people you know in your Lightroom catalog, but … you have several thousand photos in your catalog and you don’t want to spend time reviewing photos you’ve already keyworded. How to avoid that?
This is where a technique I call worklist keywords comes in handy. The idea is simple: Use another keyword to keep track of which photos you’ve reviewed for a certain subject area. Here’s how it works:
Getting Started
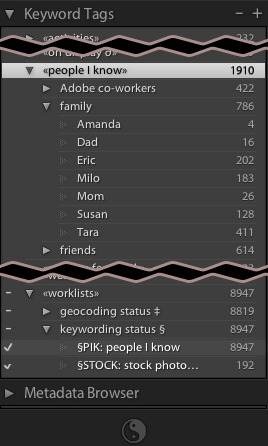
When I’m embarking on a new keywording effort, I start by building up keywords for the subject matter. (You can also do this on an ad-hoc basis once you’re reviewing the keywords.) As an example, this is the keywords panel from my Lightroom catalog showing the keyword hierarchy for people I know and my family. (Side note: I surround my top-level keyword names — the categories — with «» symbols to ensure that they fall to the bottom of the list. That way, if I add a new keyword and forget to place it into my keywording hierarchy, it shows up at the top of the list. It’s obviously different from the other top-level keywords, which serves as a reminder to find a home for it in the hierarchy.)
Before I start actually applying those keywords, however, I also create the extra keyword to track my keywording progress. I like to organize these under another keyword category I call «worklists». (This is just an organizational tactic I like; adapt it to suit your taste.) What is important here is to give your worklist keywords a tag phrase that is unlikely to occur anywhere else in your metadata. On the Mac, it’s relatively easy to type unusual symbols, so I like to use those in my worklist keyword names.

For example, I’ve created a keyword named “§PIK: people I know”. (On U.S. Mac keyboards, the § symbol can by entered by typing Option-6.) I don’t think this keyword is interesting to anybody but me, so I’ve turned off the options for include on export, export parents, and export synonyms in the options for this keyword.
Now that you’ve created your worklist keyword, you’re ready to get started.
Reviewing Your Worklist
Lightroom doesn’t offer the ability to search for photos that don’t have a particular keyword. I expect that we’ll that feature someday, but until we do, this workaround can get the job done.
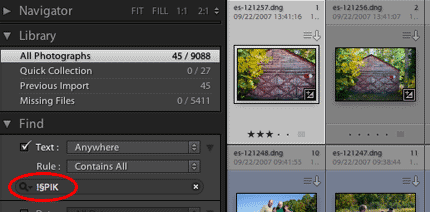
In Lightroom’s Find panel, type ! followed by the distinctive phrase for your worklist keyword. The ! is a special shortcut that tells Lightroom to find those photos that don’t match the remainder of that word. Lightroom will immediately narrow your photo library to those photos that don’t match that string. Make sure the Text popup is set to either “Anywhere” (the default) or “Keywords.” Also make sure the Rule popup is set to “Contains” or “Contains All”.
In this screen shot, I have used this technique to filter my library from over 9,000 photos down to the 45 photos I haven’t yet reviewed for people I know.
With this filter in place, you can make short work of reviewing and updating the remaining photos.
Whittle Through the Worklist
For this stage of the game, I check a few quick settings in the Library module:
- Library is in grid view. Thumbnails are just large enough that I can recognize faces.
- Keywording panel (on the right side) is open.
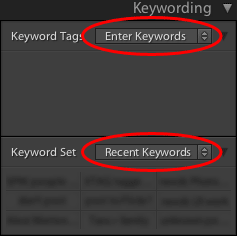
- In the keywording panel, the Keyword Tags popup is set to “Enter Keywords” and the Keyword Set popup is set to “Recent Keywords.”
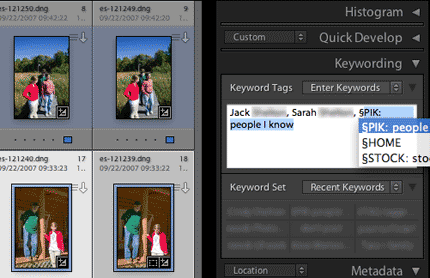
Pick your first few photos to keyword. Here, I’ve selected two photos of my friend Jack and his daughter Sarah. I type their names in the Keywording panel. After I’ve got them entered, then I start typing §PIK. Notice from the screen shot that Lightroom’s auto-completion picked up on my keyword name, so I don’t have to finish typing.
Now here’s where you can start to really pick up speed. As soon as you apply the worklist keyword, two nice things happen: (1) the photos disappear from the library grid, and (2) the interesting keywords appear in your Recent Keywords list. If, like me, you shoot series of photos with various friends moving in and out of them, you’ll pretty quickly have all the friends who were there on a particular day in the Recents list. Plus, your worklist keyword appears there right away. (You were getting tired of finding that Option-6 or Alt+01-whatever-whatever character, right? 🙂 ) So now you can mouse-click your way through all the photos with your friends in them.
Update: Dan’s comment reminded me of something I had meant to say when I was writing this post: Semantically, applying the worklist keyword means “I’ve scanned this photo for people I know,” not “this photo has people I know.” So you should apply it even to photos that don’t contain people you know, once you’ve verified that. This will keep it off the list for future reviews.
Extending the Concept
You can create multiple worklist keywords similar to this one for different tasks. In my catalog, there are worklists for:
- copyright registration
- geocoding status
- several different keyword lists
- review status (i.e. is this photo worth displaying somewhere?)
I use a similar approach to ensure that all of my photos have star ratings and color labels.
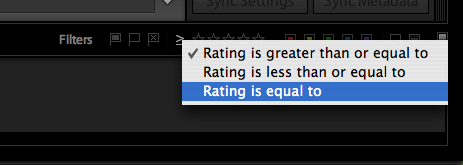
To see photos without star ratings, open the filmstrip at the bottom of the catalog window. Look for the >= sign in the Filters area. Set it to “Rating is equal to” (as shown in the screen shot). Select one or more photos and type 1, 2, 3, 4, or 5 to give it a star rating. As soon as you do this, the photo(s) disappear from view and you have another set to rate. (I often switch to loupe view in the library module to get a better sense of the quality of the photo when I’m doing this.)
Similarly, you can whittle through all photos without a color label. There isn’t an on-screen shortcut for this, but you can get there by going to the menu bar and selecting Library > Filter by Color Label > No Label. Don’t forget to go back and select Library > Filter by Color Label > Reset this Filter when you’re done.