One of the new enhancements to Lightroom 4.1 RC2 is the addition of new color fringe correction controls. What exactly is a color fringe correction? This blog post is intended to explain the problem and the solution we’ve provided in Lightroom 4.1.(For ACR customers it will also be included an upcoming version of ACR7 for Photoshop CS6, currently available as a public beta)
The content in this post has been written by Eric Chan, the developer primarily responsible for implementing the solution. (Photos have been attributed where requested.)
Overview
Red-green and blue-yellow fringes at the image periphery result from lateral chromatic aberration. This problem is relatively easy to fix, and ACR & LR already have tools to do so. On the other hand, purple and green fringes in out-of-focus areas and along high-contrast boundaries are much more problematic. These fringes result from axial chromatic aberration (wavelength-dependent focus shift), aberrations in sensor microlenses, and flare. In most cases, purple fringes appear in front of the plane of focus, and green fringes appear behind the plane of focus. The aberrations can happen anywhere in the image, not just the image periphery. Sometimes, they are so strong that they’re easily spotted in small previews, such as proxies and thumbnails (thus, not only visible at 100% pixel view!). Axial CA affects nearly all lenses, from inexpensive cell phone lenses to very expensive top-of-the-line lenses. It is particularly pronounced with fast lenses at wide apertures. Hence, an improved defringe control should appeal to photographers shooting portraits, events, weddings, sports, etc. — anytime that high-speed lenses are used.
Example
Example 1: Backyard
The branches and leaves have very strong purple fringing, visible even in the small overview image.Overview, original:Overview, with defringe:
Closeup, original:
Closeup, with defringe:
Color Fringing Defined
Types of Fringing
- Color fringing (usually visible on high-contrast edges in the image) can result from several physical phenomena:
- Lateral (transverse) chromatic aberration (red/green fringes, blue/yellow fringes),
- Axial (longitudinal) chromatic aberration (purple and green fringes),
- Flare due to lens-lens and sensor-lens reflections (ghost images), and
- Charge leakage in CCD sensors (thin purple fringes).
- Adobe’s existing “Remove Chromatic Aberration” checkbox (introduced in Camera Raw 7.0 and Lightroom 4.0), and its predecessors (Profile-based “Chromatic Aberration” slider, and manual Chromatic Aberration sliders) handles issue #1 (lateral CA) only.
- The previous Defringe popup menu (Off / Highlight Edges / All Edges) in Camera Raw 7.0 and Lightroom 4.0 handles issue #4 (CCD charge leakage) only.
- Up till now, Adobe did not have solutions for problems #2 (axial CA) and #3 (flare).
Notes on Axial (Longitudinal) CA
The new Defringe controls are designed to fix axial (longitudinal) CA, color aberrations due to ghosting or flare, and color aberrations (thin fringes) due to charge leakage, which affects some CCD sensors. Here’s some context on axial/longitudinal CA:
- It can happen anywhere in the image (not just image borders).
- It affects nearly all “fast” (wide aperture) lenses, typically most visible at the wider apertures (e.g., f/1.4 thru f/2.8).
- Fringes become less visible as you stop down the lens (e.g., more visible at f/2, less visible at f/8).
- Fringes are usually most visible just in front of or just behind the plane of focus.
- Fringes typically appear purple/magenta when they’re in front of the plane of focus, and appear green when they’re behind the plane
- of focus.
- Even at the plane of focus, high-contrast edges (especially backlit) may show purple fringes due to flare.
How to use the new Defringe Controls
Slider Overview
There are 4 sliders:
- Two amount sliders (Purple Amount, Green Amount). These are normal sliders.
- Two hue sliders (Purple Hue, Green Hue). These are “split” sliders.
The two “Purple” controls are intended to be used to remove purple fringing (regardless of the cause).
The “Purple Amount” slider determines the strength of the purple fringe removal. The range is 0 to 20, with default 0 (which means disabled). Higher values mean stronger correction, but may also negatively impact colors of real purple objects in your image. Note that fringe removal is limited to the hue range defined by the Purple Hue slider (see below).The “Purple Hue” slider determines the range of hues removed. This control has two knobs, which determine the endpoints of the hue range.
- Click-and-drag either knob to adjust one endpoint at a time.
- Click-and-drag the central bar (the part of the slider between the two knobs) to move both endpoints at the same time.
- Double-click a knob to reset its value to the default.
- Double-click the central bar to reset both endpoints to the default.
- The minimum spacing between the endpoints is 10 units. Hence, dragging the left knob too close to the right knob will cause the right knob to move automatically, to preserve the minimum spacing of 10 units.
The Green Amount and Green Hue sliders work similarly for green fringes. However, the default range for the Green Hue slider is 40 to 60 (narrower range) instead of 30 to 70. This is to help protect common green and yellow colors (e.g., foliage) by default.
These controls are best used when viewing an image closely (e.g., 100% or higher).
Option-Key Feedback (Visualization) for Global Controls
Alt/Option-key visualization is available for all 4 controls. I highly recommend using these visualizations to help set the slider values appropriately:
Option-key + click-and-drag on the Purple Amount slider to visualize purple fringe removal. The preview window shows only the affected areas of the image (all other areas will be shown as white). This lets you concentrate on the affected areas and verify that the purple fringe color gets removed.
Option-key + click-and-drag on the Purple Hue slider (either knob, or the central bar) to visualize the range of hues to be defringed. The preview window “blacks out” the affected hue range. Pay attention to the borders of the “blacked out” area and check if there are any residual purple/magenta colors.
Works similarly for the Green Amount and Green Hue sliders.
Description of Eyedropper Tool
The 4 global Defringe controls above are powerful, but new users may find them tricky to learn. For this reason, there is an “eyedropper”tool so that users can click directly on the image to help set the appropriate parameters.
Using the eyedropper for Defringe is similar to using the eyedropper to using the White Balance selection eyedropper: when you’re in the LensCorrections -> Color tab (so that the Defringe controls are visible), select the eyedropper and click on a fringe in the image. It helps to be zoomed in (e.g., 200% or even 400%) to facilitate accurate color picking.
Clicking on a pixel will cause the Defringe system to perform a local analysis of the pixels in the neighborhood, resulting in one of the following 3 outcomes:
- It determines that you clicked on a purple fringe, and it automatically adjusts both the Purple Amount and Purple Hue sliders.
- It determines that you clicked on a green fringe, and it automatically adjusts both the Green Amount and Green Hue sliders.
- It determines that you clicked on an area that was too neutral or outside the supported color range (e.g., all white or gray area or an orange color) and reports an error message.
While moving the eyedropper tool over the image, you will see the eyedropper icon change to purple or green and the Purple Hue or Green Hue slider highlighting. This shows approximately what hue you’re currently targeting, and which of the two fringe colors (purple or green) would be adjusted if you were to click.
Press ESC or Return/Enter to dismiss the eyedropper sampling window once you have done with the selecting the purple and green fringe colors.
Description of Local Defringe Control
The global Defringe control is sufficient in many cases, but sometimeslocal refinement is required. One reason is the need to “protect”certain scene colors (prevent them from being defringed). Another reason is to help suppress some minor residual fringing in aparticular area. For these reasons, Defringe is also available as a local adjustment.
Details:
- Available as a brush or gradient (as with all our local adjustment channels).
- Only available in PV 2012.
- Standard range is -100 to +100, default 0.
- Minus direction (towards -100) means “do not apply defringe to the affected area.” This is a way for the user to “protect” certain image areas from being incorrectly defringed. For example, applying a strong purple fringe removal may indeed effectively remove those fringes, but it may also desaturate or otherwise (undesirably) alter edges of purple objects in your picture. Painting with Defringe -100 over those areas will completely protect them and keep them at their original color.
- Positive direction (towards +100) means “apply additional defringing to the affected area.” This is a way for the customer to fine-tune and take care of small problem areas.
- For images that have only limited color fringe problems in a specific area, it may actually be easier (both faster and safer) to use the local Defringe control.
- Note that local +Defringe will remove fringes of all colors (not just purple and green) and hence is independent of the global Purple Hue and Green Hue settings.
- The maximum strength of local +Defringe is limited (not nearly as strong as global defringe), so for extreme cases you will need to use the global Defringe instead. (In general, I recommend using global Defringe first anyways, then following up local Defringe if needed.)
Suggested Workflow
1. Do overall color and tone corrections first (e.g., Basic panel, Tone Curve panel, etc.).
2. Turn on profile-based lens corrections (for distortion and vignetting), if needed.
3. Turn on lateral CA correction (check the “Remove Chromatic Aberration” box), if needed.
4. Apply global Defringe, if needed.
5. Apply local Defringe, if needed.
Additional Examples
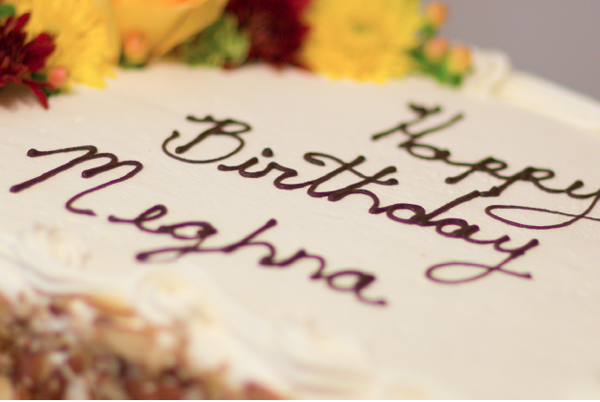
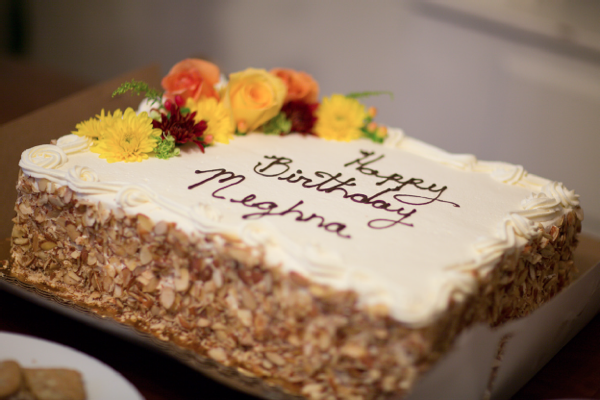
Example 2: Cake
I focused in the middle of the letters on the cake. The letters in front have purple fringes (“Meghna”), and the letters in back have green fringes (“Happy”), with some alternating green-magenta bands. These are typical symptoms of axial chromatic aberration. With the new defringe filter, the purple and green fringes are largely reduced. Note that this is not a straightforward desaturation (which would turn the letters and cake gray).
Overview of image:
Closeup, original:
Closeup, with defringe:
Example 3: Champagne
Similar situation. The closeup shows mild purple fringing on the closer letters, and much stronger green fringing on the letters around the side of the bottle (just behind the plane of focus). Also, the circular out-of-focus highlights in the background have a green outline. These issues are largely reduced with the new defringe filter.
Overview, original (color fringing on bottle letters slightly visible even at this size):Closeup, original:
Closeup, with defringe:
Closeup #2, original:
Closeup #2, with defringe:
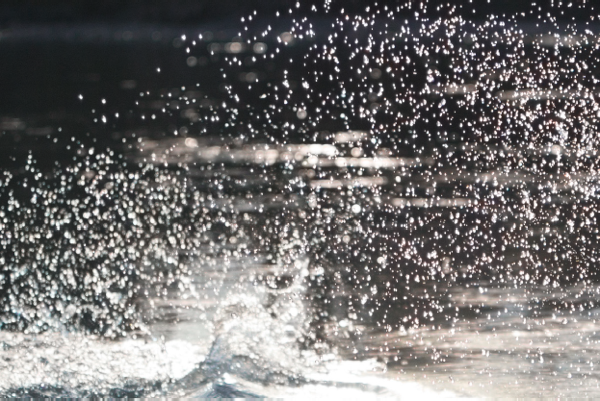
Example 4: Water
The water spray shows very strong green and purple fringes, even in the small overview image — yikes! The foreground elements (such as the railing) also show purple fringes, since they’re in front of the plane of focus. Special thanks Stanislas Chevallier for providing our engineering team with this example and providing us with permission to post the image here. His work can be found on Flickr: http://flickr.com/chegayvaraOverview, original:
Overview, with defringe:
Closeup #1, original:
Closeup #1, with defringe:
Closeup #2, original:
Closeup #2, with defringe:
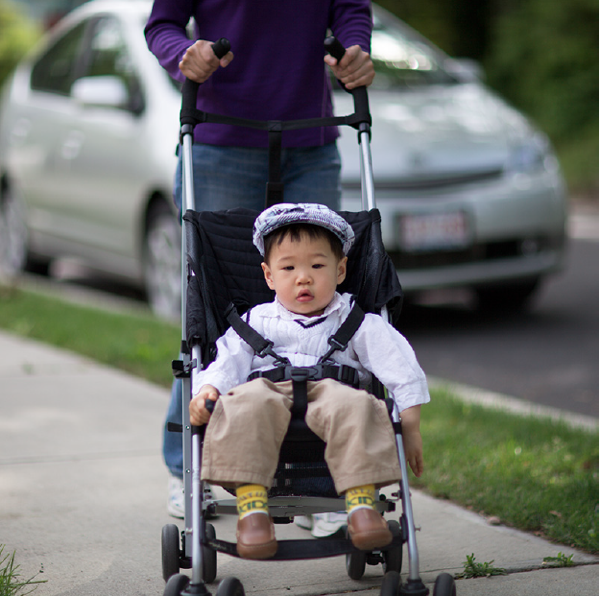
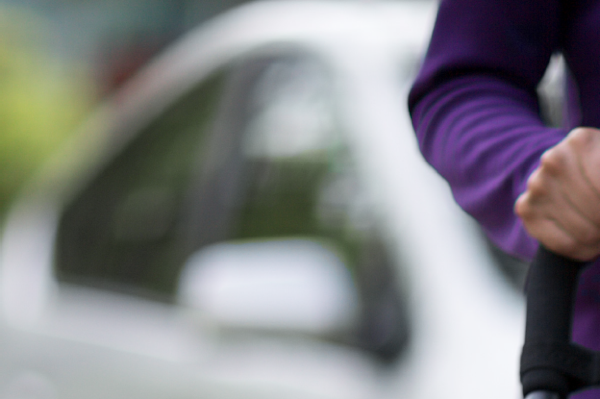
Example 5: Boy
There is visible purple fringing on his hat and shirt. He may have the blues, but he shouldn’t have the purples. 😉 There is also green fringing on the highlights of the car in the background.Overview, original:
Closeup, original:Closeup, with defringe:
Closeup #2, original:
Closeup #2, with defringe: