DNG 1.4 Specification Notes

I’ve received a number of questions about what’s new in the DNG 1.4 specification that we posted earlier this week.  If you’re not comfortable diving into the 101 page document, here’s a quick summary with a few of the potential implications of the new enhancements to the file format.  [Please note that this content is an adaptation of a presentation created by Thomas Knoll, co-creator of Photoshop and creator of Adobe Camera Raw and the DNG file format.]  Before we dig into the new changes I think it’s worth looking at the history of DNG format innovations:

DNG Revision History

DNG Version 1.0 – September 2004

  • Initial Release

DNG Version 1.1 – February 2005

  • Preserving Masked Pixels

DNG Version 1.2 – April 2008

  • Camera Profiles (See also, DNG Profile Editor)

DNG Version 1.3 – June 2009

  • Opcodes (e.g. Lens Corrections)

DNG Version 1.4 – October 2012

  • Default User Crop
  • Transparency
  • Floating Point (HDR)
  • Lossy Compression
  • Proxies


Default User Crop

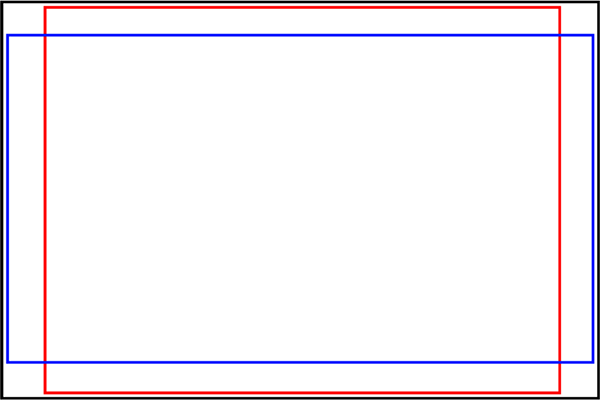
Many cameras have aspect ratio crop modes, e.g. 4:3 or 16:9, yet still save the entire sensor image to the raw file.  In the image below you can see that the raw file contains the entire black area within both of the camera’s crop modes.  The new tags allows the crop setting to be respected but to also allow the customer to “un-crop” the image to see the entire sensor area.  (See the new DNG Recover Edges Plug-in for Lightroom on Adobe Labs to “un-crop” a DNG file: http://labs.adobe.com/technologies/lightroomplugins/)


Transparency

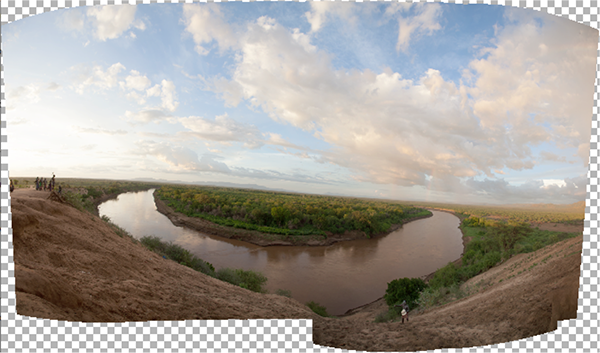
When images are “stitched together” in an alignment process or panorama process the resulting image could have “undefined” pixels around the edges.  The new specification update now allows for those undefined areas to exist in a raw file format.


Floating Point (HDR)

HDR images have a high dynamic range that will not fit into a 16-bit linear integer encoding.  Floating point storage of information allows for a larger amount of dynamic range to be stored within a file:

  • 16-bit integer data can only store 16 f-stops of image detail.
  • 16-bit floating point data can store over 30 f-stops of image detail.
  • 32-bit floating point data can store hundreds of f-stops of image detail.

Lossy Compression

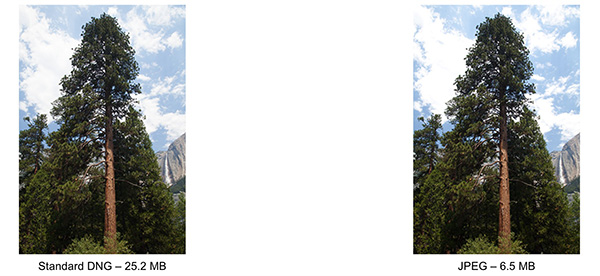
The current tradeoff in image quality and file size between a DNG and JPEG file:

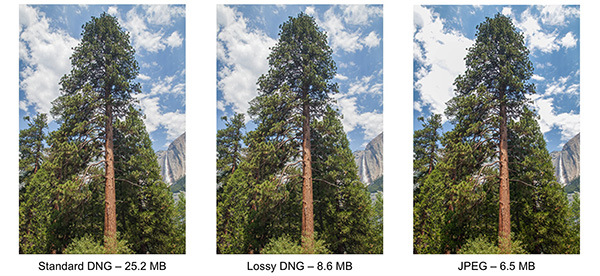
A lossy compressed DNG file is much smaller but maintains the flexibility of raw data:

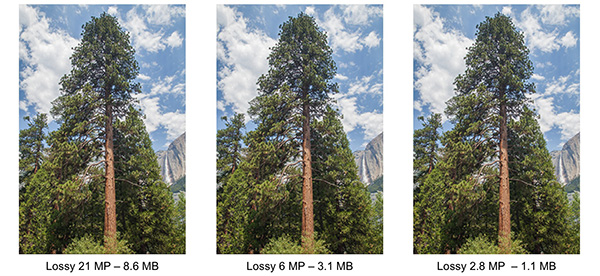
DNG Proxies combine the ability to utilize lossy compression with downsampling.

Summary

These new features to the DNG file format are exciting imaging advances that enable numerous workflow opportunities.

New Color Fringe Correction Controls

One of the new enhancements to Lightroom 4.1 RC2 is the addition of new color fringe correction controls. What exactly is a color fringe correction? This blog post is intended to explain the problem and the solution we’ve provided in Lightroom 4.1.(For ACR customers it will also be included an upcoming version of ACR7 for Photoshop CS6, currently available as a public beta)

The content in this post has been written by Eric Chan, the developer primarily responsible for implementing the solution. (Photos have been attributed where requested.)

Overview

Red-green and blue-yellow fringes at the image periphery result from lateral chromatic aberration. This problem is relatively easy to fix, and ACR & LR already have tools to do so. On the other hand, purple and green fringes in out-of-focus areas and along high-contrast boundaries are much more problematic. These fringes result from axial chromatic aberration (wavelength-dependent focus shift), aberrations in sensor microlenses, and flare. In most cases, purple fringes appear in front of the plane of focus, and green fringes appear behind the plane of focus. The aberrations can happen anywhere in the image, not just the image periphery. Sometimes, they are so strong that they’re easily spotted in small previews, such as proxies and thumbnails (thus, not only visible at 100% pixel view!). Axial CA affects nearly all lenses, from inexpensive cell phone lenses to very expensive top-of-the-line lenses. It is particularly pronounced with fast lenses at wide apertures. Hence, an improved defringe control should appeal to photographers shooting portraits, events, weddings, sports, etc. — anytime that high-speed lenses are used.

Example

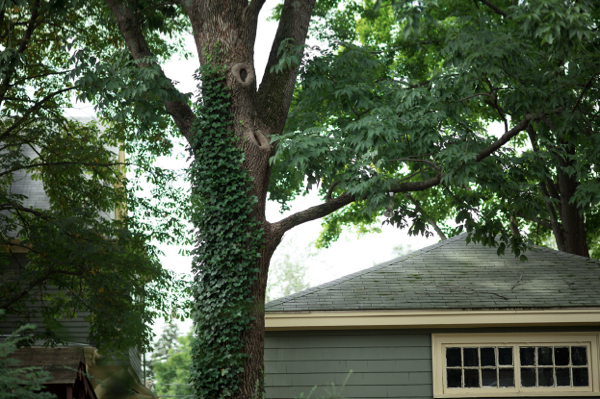
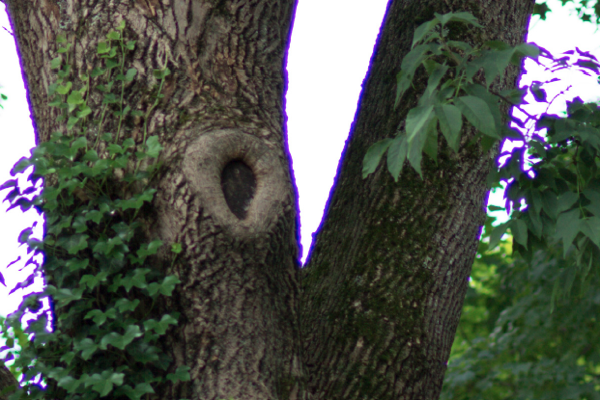
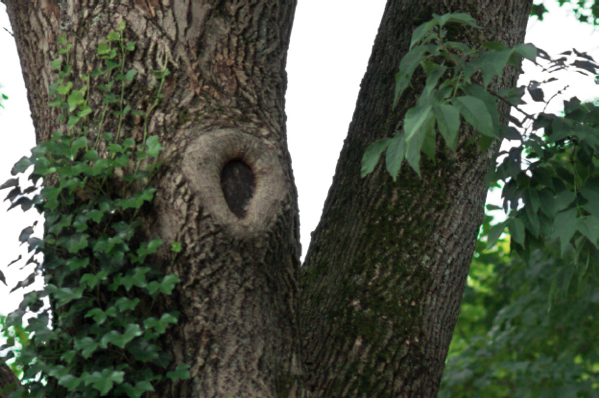
Example 1: Backyard
The branches and leaves have very strong purple fringing, visible even in the small overview image.Overview, original: Screen Shot 2012 04 25 at 3 01 20 PMOverview, with defringe: Screen Shot 2012 04 25 at 3 01 29 PMCloseup, original: Screen Shot 2012 04 25 at 3 01 40 PMCloseup, with defringe: Screen Shot 2012 04 25 at 3 01 50 PM
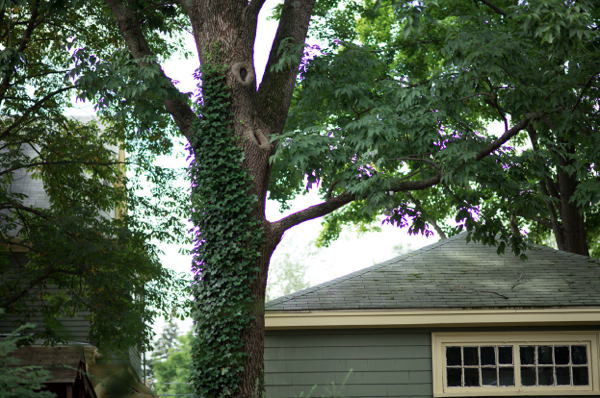
Color Fringing Defined

Types of Fringing

  • Color fringing (usually visible on high-contrast edges in the image) can result from several physical phenomena:
    1. Lateral (transverse) chromatic aberration (red/green fringes, blue/yellow fringes),
    2. Axial (longitudinal) chromatic aberration (purple and green fringes),
    3. Flare due to lens-lens and sensor-lens reflections (ghost images), and
    4. Charge leakage in CCD sensors (thin purple fringes).
  • Adobe’s existing “Remove Chromatic Aberration” checkbox (introduced in Camera Raw 7.0 and Lightroom 4.0), and its predecessors (Profile-based “Chromatic Aberration” slider, and manual Chromatic Aberration sliders) handles issue #1 (lateral CA) only.
  • The previous Defringe popup menu (Off / Highlight Edges / All Edges) in Camera Raw 7.0 and Lightroom 4.0 handles issue #4 (CCD charge leakage) only.
  • Up till now, Adobe did not have solutions for problems #2 (axial CA) and #3 (flare).

Notes on Axial (Longitudinal) CA

The new Defringe controls are designed to fix axial (longitudinal) CA, color aberrations due to ghosting or flare, and color aberrations (thin fringes) due to charge leakage, which affects some CCD sensors.  Here’s some context on axial/longitudinal CA:

  • It can happen anywhere in the image (not just image borders).
  • It affects nearly all “fast” (wide aperture) lenses, typically most visible at the wider apertures (e.g., f/1.4 thru f/2.8).
  • Fringes become less visible as you stop down the lens (e.g., more visible at f/2, less visible at f/8).
  • Fringes are usually most visible just in front of or just behind the plane of focus.
  • Fringes typically appear purple/magenta when they’re in front of the plane of focus, and appear green when they’re behind the plane
  • of focus.
  • Even at the plane of focus, high-contrast edges (especially backlit) may show purple fringes due to flare.

How to use the new Defringe Controls

Slider Overview

There are 4 sliders:

  • Two amount sliders (Purple Amount, Green Amount). These are normal sliders.
  • Two hue sliders (Purple Hue, Green Hue). These are “split” sliders.

The two “Purple” controls are intended to be used to remove purple fringing (regardless of the cause).

The “Purple Amount” slider determines the strength of the purple fringe removal. The range is 0 to 20, with default 0 (which means disabled). Higher values mean stronger correction, but may also negatively impact colors of real purple objects in your image. Note that fringe removal is limited to the hue range defined by the Purple Hue slider (see below).The “Purple Hue” slider determines the range of hues removed. This control has two knobs, which determine the endpoints of the hue range.

  • Click-and-drag either knob to adjust one endpoint at a time.
  • Click-and-drag the central bar (the part of the slider between the two knobs) to move both endpoints at the same time.
  • Double-click a knob to reset its value to the default.
  • Double-click the central bar to reset both endpoints to the default.
  • The minimum spacing between the endpoints is 10 units. Hence, dragging the left knob too close to the right knob will cause the right knob to move automatically, to preserve the minimum spacing of 10 units.

The Green Amount and Green Hue sliders work similarly for green fringes. However, the default range for the Green Hue slider is 40 to 60 (narrower range) instead of 30 to 70. This is to help protect common green and yellow colors (e.g., foliage) by default.

These controls are best used when viewing an image closely (e.g., 100% or higher).

Option-Key Feedback (Visualization) for Global Controls

Alt/Option-key visualization is available for all 4 controls. I highly recommend using these visualizations to help set the slider values appropriately:

Option-key + click-and-drag on the Purple Amount slider to visualize purple fringe removal. The preview window shows only the affected areas of the image (all other areas will be shown as white). This lets you concentrate on the affected areas and verify that the purple fringe color gets removed.

Option-key + click-and-drag on the Purple Hue slider (either knob, or the central bar) to visualize the range of hues to be defringed. The preview window “blacks out” the affected hue range. Pay attention to the borders of the “blacked out” area and check if there are any residual purple/magenta colors.

Works similarly for the Green Amount and Green Hue sliders.

Description of Eyedropper Tool

The 4 global Defringe controls above are powerful, but new users may find them tricky to learn. For this reason, there is an “eyedropper”tool so that users can click directly on the image to help set the appropriate parameters.

Using the eyedropper for Defringe is similar to using the eyedropper to using the White Balance selection eyedropper: when you’re in the LensCorrections -> Color tab (so that the Defringe controls are visible), select the eyedropper and click on a fringe in the image.  It helps to be zoomed in (e.g., 200% or even 400%) to facilitate accurate color picking.
Clicking on a pixel will cause the Defringe system to perform a local analysis of the pixels in the neighborhood, resulting in one of the following 3 outcomes:

  • It determines that you clicked on a purple fringe, and it  automatically adjusts both the Purple Amount and Purple Hue  sliders.
  • It determines that you clicked on a green fringe, and it  automatically adjusts both the Green Amount and Green Hue sliders.
  • It determines that you clicked on an area that was too neutral or outside the supported color range (e.g., all white or gray area or an orange color) and reports an error message.

While moving the eyedropper tool over the image, you will see the eyedropper icon change to purple or green and the Purple Hue or Green Hue slider highlighting.  This shows approximately what hue you’re currently targeting, and which of the two fringe colors (purple or green) would be adjusted if you were to click.

Press ESC or Return/Enter to dismiss the eyedropper sampling window once you have done with the selecting the purple and green fringe colors.

Description of Local Defringe Control

The global Defringe control is sufficient in many cases, but sometimeslocal refinement is required. One reason is the need to “protect”certain scene colors (prevent them from being defringed). Another reason is to help suppress some minor residual fringing in aparticular area. For these reasons, Defringe is also available as a local adjustment.
Details:

  • Available as a brush or gradient (as with all our local adjustment channels).
  • Only available in PV 2012.
  • Standard range is -100 to +100, default 0.
  • Minus direction (towards -100) means “do not apply defringe to the affected area.” This is a way for the user to “protect” certain image areas from being incorrectly defringed. For    example, applying a strong purple fringe removal may indeed effectively remove those fringes, but it may also desaturate or otherwise (undesirably) alter edges of purple objects in your    picture. Painting with Defringe -100 over those areas will completely protect them and keep them at their original color.
  • Positive direction (towards +100) means “apply additional defringing to the affected area.” This is a way for the customer to fine-tune and take care of small problem areas.
  • For images that have only limited color fringe problems in a specific area, it may actually be easier (both faster and safer) to use the local Defringe control.
  • Note that local +Defringe will remove fringes of all colors (not just purple and green) and hence is independent of the global Purple Hue and Green Hue settings.
  • The maximum strength of local +Defringe is limited (not nearly as strong as global defringe), so for extreme cases you will need to use the global Defringe instead. (In general, I       recommend using global Defringe first anyways, then following up local Defringe if needed.)

Suggested Workflow

1. Do overall color and tone corrections first (e.g., Basic panel, Tone Curve panel, etc.).
2. Turn on profile-based lens corrections (for distortion and vignetting), if needed.
3. Turn on lateral CA correction (check the “Remove Chromatic Aberration” box), if needed.
4. Apply global Defringe, if needed.
5. Apply local Defringe, if needed.

Additional Examples

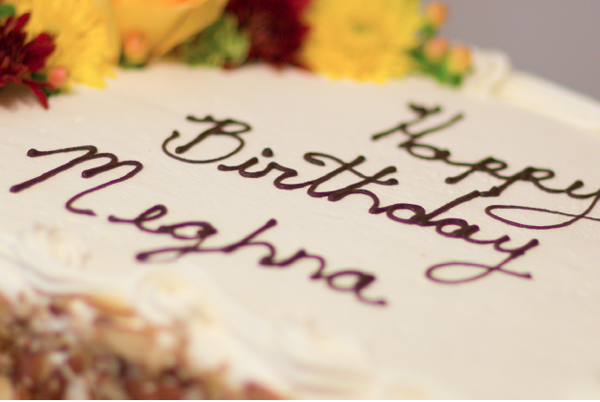
Example 2: Cake 
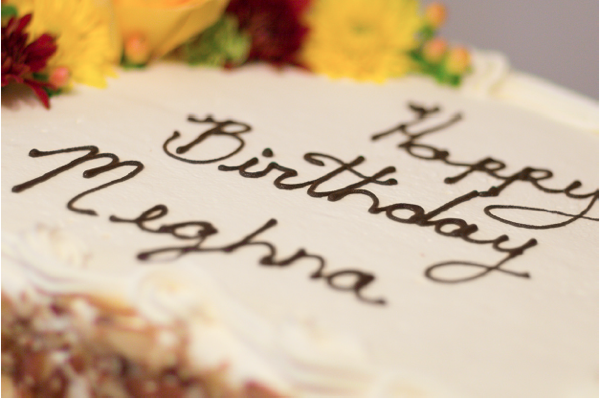
I focused in the middle of the letters on the cake. The letters in front have purple fringes (“Meghna”), and the letters in back have green fringes (“Happy”), with some alternating green-magenta bands. These are typical symptoms of axial chromatic aberration. With the new defringe filter, the purple and green fringes are largely reduced. Note that this is not a straightforward desaturation (which would turn the letters and cake gray).

Overview of image: Screen Shot 2012 04 25 at 2 49 03 PM

Closeup, original: Screen Shot 2012 04 25 at 2 49 16 PM
Closeup, with defringe: Screen Shot 2012 04 25 at 2 49 25 PM
Example 3: Champagne
Similar situation. The closeup shows mild purple fringing on the closer letters, and much stronger green fringing on the letters around the side of the bottle (just behind the plane of focus). Also, the circular out-of-focus highlights in the background have a green outline. These issues are largely reduced with the new defringe filter.
Overview, original (color fringing on bottle letters slightly visible even at this size): Screen Shot 2012 04 25 at 2 57 45 PMCloseup, original: Screen Shot 2012 04 25 at 2 57 54 PMCloseup, with defringe: Screen Shot 2012 04 25 at 2 58 08 PMCloseup #2, original: Screen Shot 2012 04 25 at 2 58 24 PMCloseup #2, with defringe: Screen Shot 2012 04 25 at 2 58 33 PM
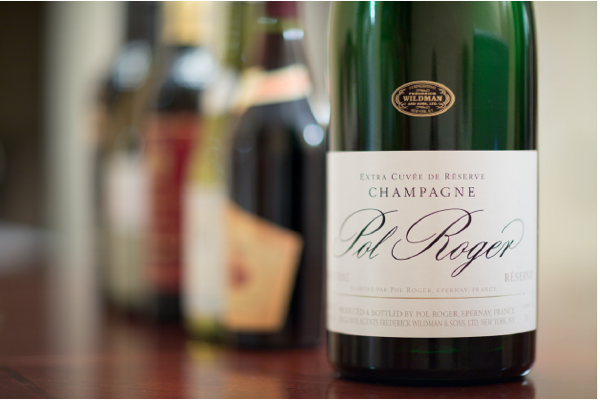
Example 4: Water 
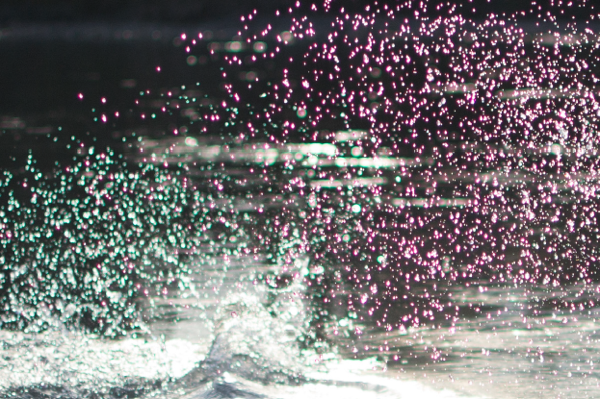
The water spray shows very strong green and purple fringes, even in the small overview image — yikes! The foreground elements (such as the railing) also show purple fringes, since they’re in front of the plane of focus.  Special thanks Stanislas Chevallier for providing our engineering team with this example and providing us with permission to post the image here.  His work can be found on Flickr: http://flickr.com/chegayvara

Overview, original: Screen Shot 2012 04 25 at 3 03 48 PMOverview, with defringe: Screen Shot 2012 04 25 at 3 03 57 PMCloseup #1, original: Screen Shot 2012 04 25 at 3 04 06 PMCloseup #1, with defringe:

Screen Shot 2012 04 25 at 3 04 14 PM

Closeup #2, original: Screen Shot 2012 04 25 at 3 04 23 PMCloseup #2, with defringe: Screen Shot 2012 04 25 at 3 04 30 PMExample 5: Boy
There is visible purple fringing on his hat and shirt. He may have the blues, but he shouldn’t have the purples. 😉 There is also green fringing on the highlights of the car in the background.Overview, original: Screen Shot 2012 04 25 at 3 16 35 PM
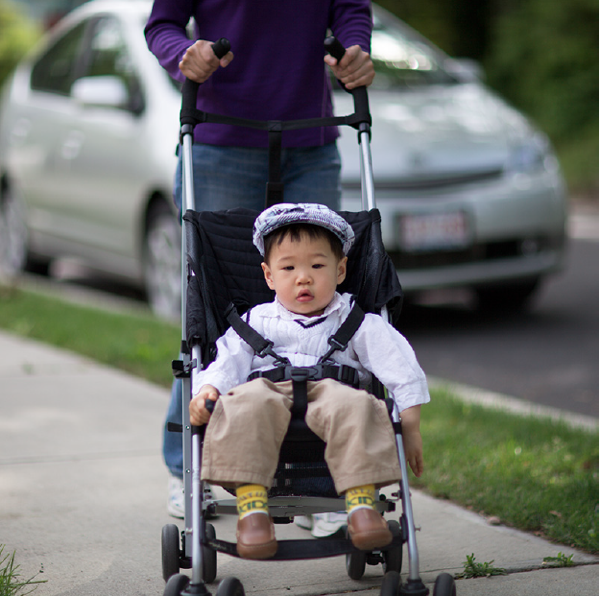
Closeup, original: Screen Shot 2012 04 25 at 3 16 43 PMCloseup, with defringe: Screen Shot 2012 04 25 at 3 16 52 PMCloseup #2, original: Screen Shot 2012 04 25 at 3 17 02 PMCloseup #2, with defringe: Screen Shot 2012 04 25 at 3 17 12 PM


Magic or Local Laplacian Filters?

The Lightroom and Camera Raw team has been very pleased with all of the positive feedback on the new image processing(PV2012) available in the Lightroom 4 beta. (It will also be available in the next major version of the Camera Raw plug-in)  The ability to recover shadow and highlight detail with a straightforward set of controls without introducing artifacts or over-the-top faux-HDR effects is a huge leap forward in image processing.  I thought Scott Kelby summed it up quite well when he said, “Your photos look better processed in Lightroom 4. Period.”  Often, when a product from the Photoshop family produces something incredible, it’s referred to as magic.   However, the real magic is how the talented engineers at Adobe convert cutting edge research into elegant, easy to use software solutions.

The cutting edge research in this case is a paper titled, Local Laplacian Filters: Edge-aware Image Processing with a Laplacian Pyramid.   The title is certainly a mouthful and the body of the paper will be difficult to comprehend unless  you’ve spent a fair amount of time with equations that contain more Greek letters than numbers.  But don’t let the complexity prevent you from downloading the paper and perusing some of the sample images that demonstrate the challenges and results using various processing techniques.  The research is so impressive that it was published in SIGGRAPH 2011*, a prestigious journal in the computer graphics industry.

Why am I sharing this very technical piece of information?  The team would like to share the praise that we’re receiving for the new processing controls with the authors of this research paper:

Sylvain Paris
Adobe Systems, Inc
Samuel W Hasinoff
Toyota Technological Institute at Chicago and MIT CSAIL
Jan Kautz
University College London


Note: There is also some contributing knowledge from this paper as well: http://dspace.mit.edu/handle/1721.1/67030 

ACM Transactions on Graphics (Proceedings of SIGGRAPH 2011).

How to optimize Lightroom performance

Anita Dennis, Learning Resources Senior Content and Community Lead, recently published a new support document, “Optimize performance | Lightroom” in response to a suggestion over at feedback.photoshop.com.

“Optimize performance | Lightroom” explores hardware configurations, Lightroom catalog and preview settings, and system maintenance tasks that can help Lightroom run at peak efficiently. Check it out and give us your feedback. Answer the question, “Was this helpful,” at the top of the article and share comments on how we can improve the content.

Thanks to customer Chris Niestepski for starting the discussion and prompting us to create the doc.

Additional Information

How to tune Photoshop for peak performance

Lightroom 3 beta now available

The Lightroom team is proud to introduce the third public beta program of our application designed by and for digital photographers. We’ve come a long way since our very first public beta on January 9th 2006 at MacWorld.(We didn’t even have a crop tool in the first release!) For this latest release we went back to the drawing board and revisited what we believe are the fundamental priorities of our customers: Performance and Image Quality. Lightroom has been stripped down to the “engine block” in order to rebuild a performance architecture that meets the needs of photographers with growing image collections and increasing megapixels. The raw processing engine has also received an overhaul right down to the fundamental demosaic algorithms that now allows unprecedented sharpening and noise reduction results.

Revisiting the success of the first Lightroom public beta, we want to provide photographers with early access to this new technology so that we have adequate time to respond to feedback. While we’re not going all the way back to a 14 month, 4 version public beta like we did for Lightroom 1, we do want more flexibility than we had in our public beta for Lightroom 2. Here are a few key details on what we’re looking for feedback on:

Import
We’ve redesigned the Lightroom import experience to make it much easier to visualize how Lightroom allows you to manage your files. You’ll be able to see exactly where you’ve asked Lightroom to copy your files off your card and then use import presets in compact mode to get fast repeatable results every time. You can also quickly browse your hard drive to find exactly the right file you need to work on.

Publish Collections
We live in a connected world so you need direct access to publish your photos on your favorite sharing site from directly within the Lightroom Library. In the Lightroom 3 public beta we’re providing direct access to the Flickr photo sharing site so that adding images to your Photostream is as simple as a drag and drop. You can see all of your uploaded images and if you make any changes to those images you can have them updated on Flickr automatically.(Pro accounts only) When a visitor comments on your images, Lightroom can pull that comment right back into the Library so that you can see feedback on your files where it belongs, next to the image in your Lightroom library. We’ve built this functionality with the same extensibility designed for our Export Plug-ins so if Flickr isn’t your cup of tea we’re working hard to support developers who can create connections to any of the popular photo sharing sites. Publish collections can do more than just publish to a photo sharing site. You can have a publish collection that allows you to publish images to my iPhone sync folder with drag and drop simplicity.

Image Quality
Sharpening and Noise Reduction
In the Develop module we’ve focused on tuning our raw processing algorithms to extract incredible detail and quality from your images. Capture sharpening and Color Noise Reduction improvements work together to give you incredible noise reduction results without losing that fine detail. We’re only halfway through our noise reduction efforts but believe that you will be very pleased with the results so far. We’ve actually disabled the previous Luminance Noise Reduction so that you can focus on evaluating the Color Noise reduction implementation.

Grain
While Lightroom’s improved noise reduction will give you incredibly smooth images, sometimes you want a little texture or grain in your images. We’ve added a grain tool that can add a natural film-style grain to your images to get that perfect look for your photo.

Vignette
The Lightroom team received quite a bit of feedback on our post-crop vignette tool in Lightroom 2 that allows photographers to apply beautifully styled vignettes after cropping is applied. While the tool was received quite well, we found that photographers wanted a more natural vignette that utilized an exposure or brightness effect rather than just painting black and white on the edges of images. We’ve added two vignette modes in Lightroom 3 beta, Color Priority and Highlight Priority that attempt to provide the natural vignette that photographers have requested. Let’s not get hung up on the technical details of these models but rather focus on which you prefer for your images and why.

Process Version
The changes above are so significant that for the first time since the Camera Raw plug-in was introduced in 2003, we’ve needed to add the concept of a process version. The process version specifies which version of certain Camera Raw image processing elements should be used when rendering and editing files. Process version can affect raw, DNG, TIFF, JPEG, and PSD files. The process version is incremented only when major changes to the raw processing or features are changed. In Lightroom 3, the demosaicing, noise reduction, sharpening, and post crop vignette were all updated. Depending on what is applied to the image, different image characteristics will change more dramatically than others (i.e. sharpening should change sharpening characteristics etc.), but the demosaic changes apply across the board, so there will always be some change. By default, we’ll leave your images just as they were but if you want to take advantage of the latest processing technology, just update to the current process version. You can update to the latest process version by selecting the notification triangle that includes an exclamation point above the left hand side of the histogram. (Or from the Settings -> Process Version file menu available in the Develop module) By default, all new files in Lightroom 3 beta will receive the latest process version.

Slideshow Export
One of the most elegant ways to present your images is in a slideshow accompanied by music. But until now, you could only share that slideshow with music when playing it directly from within the Lightroom application. But with Lightroom 3 we’ve added the ability to export high quality movie files that include your detailed layout and the music track you’ve selected. By utilizing the popular H.264 movie format you can share these movies on many popular video sharing sites or optimize it for mobile media!

Custom Print Package
Lightroom 3 adds a new custom layout option for photographers who need complete control over their print layouts. Add as many different images in whatever configuration you desire on a single or multiple pages.

Watermarking
Lightroom 3’s new watermarking function lets you embed your identity or other information in your images themselves. You can apply text or graphic watermarks to a photograph with adjustable size, position, and opacity. Available in the Print and Web modules as well as the Export dialog, your identity can now travel with all of your images.

What’s Next?
We’re not even close to finished in terms of features, performance or image quality but we want early feedback on our improvements so that we have time to make sure Lightroom 3 is your ideal workflow assistant.

Additional Details
General

  • On Mac, the ‘hit zone’ for the right scroll bar in the grid view has been expanded so that a closed right hand panel doesn’t automatically open too easily. The automatic panel opening experience has been modified so that it takes a longer amount of time for the panel to open in cases of overshooting the scrollbar. (Mouse towards the white triangle for instant opening) Please provide feedback on this new behavior so that it can be modified or added to the Windows version of Lightroom.
  • Images can be sorted by aspect ratio
  • The catalog selection dialog has been expanded and improved

Library

  • You can backup your catalog when you quit Lightroom instead of on launch
  • A volume can be ejected or un-mounted from your system directly from the volume browser in the Library module.
  • Collections can be created directly within a collection set by right-clicking on the collection set
  • Images can be sorted by aspect ratio
  • The name of a collection is displayed when an image is added to a target collection
  • Stack badges can now be toggled on or off independently in the filmstrip via an interface preference
  • Erasing with the spray paint tool now requires the use of the Alt key
  • Select a folder in the Library module and choose a new option “Import to here” to launch the import dialog with that folder preselected as the destination
  • The import dialog provides source folder and destination volume capacity information
  • The option to include items from subfolders has been included in the primary Folder panel drop down menu
  • Choose Library -> Show Missing Images to locate offline or missing files
  • A lock icon has been added to the metadata filter bar in the Library module to make filter selections “global” across folders or collections
  • An icon has been added to grid thumbnails to indicate that an image is part of a collection. Click on that icon to view and/or visit the collection
  • Favorite sources can be added to the filmstrip source pop-up menu for quick access to specific collections or folders
  • Flash state is now included as part of the smart collection filter criteria
  • When the ‘spray can’ is used to add an image to a collection, the collection name is now displayed upon application
  • The optimize catalog feature is now available in the File menu
  • Lightroom now imports CMYK files. Any output, with the exception of export original, or adjustments to these images will take place in an RGB color space
  • Filters are now longer automatically “sticky” on folders or collections

Develop

  • Crop presets choices have been edited for clarity
  • A checkbox has been added to the toolbar to turn on/off overlay visibility
  • All adjustment brush and graduated filter sliders can be reset by holding down Option/Alt and clicking on Amount
  • The color setting for the adjustment brush and graduated filter clearly display an ‘x’ overlay when no color is selected
  • The Collections panel is now available in the Develop Module
  • The targeted adjustment tool is deactivated when switching to a new Develop panel
  • The local adjustment brush and graduated filter panel have been simplified to a single mode (Previously there was a button and slider ‘mode’)

Slideshow

  • The music selection in the Slideshow module has been decoupled from iTunes on the Mac
  • Click the track duration to sync the length of the slideshow to the length of the music track

Print

  • Black or a custom color can be selected for a print layout background
  • The Identity Plate can be moved in small increments by selecting it and using the arrow keys
  • Match photo aspect ratio is now a persistent option in the Cell panel

Export

  • The file extension case(UPPER/lower) can be selected in the export dialog

Full release notes are located here:
http://labs.adobe.com/technologies/lightroom3/releasenotes.pdf

Lightroom Exposed

Last year Lightroom’s lead engineer, Troy Gaul(@tgaul) presented at the C4 Mac Developer conference in Chicago. Over the course of the hour long presentation Troy provided a background on the project, dove into the details of Lightroom’s technology platform, provided a demonstration of the development environment, discussed the plug-in APIs and explained Lightroom’s path to 64-bit. The presentation is clearly targeted at developers but if you ever wanted to peek behind the curtain it’s a great opportunity. The presentation is available here: http://www.viddler.com/explore/rentzsch/videos/37

DNG Specification and Vista DNG Codec

The DNG Specification has been revised and the version number incremented from 1.1.0.0 to 1.2.0.0. This is not an area of frequent change given that the format has done a good job of addressing the progress of raw formats over the last three years.(The last update was finalized in February of 2005)  This update addresses several industry requirements for the DNG format including the formalization of the concept of a “camera profile” and a metadata tag to validate your image data. 
The definition of a camera profile for the DNG format as well as the allowance for multiple camera profiles to be embedded in a single DNG file will provide the industry with the ability to characterize raw data in an efficient and standardized format.(Think ICC profiles but for raw data)  
Additional metadata tags have been defined for the DNG format including a field to indicate a ‘hash’ or the integrity of the raw data within the file, providing a valuable tool for validating the safety of your image data.  A DNG file is comprised of three components: raw data from the sensor, metadata to describe the raw data and an embedded preview to represent your interpretation of the raw data. (See my earlier blog post on DNG if you need more background) Writing metadata back to a standardized file format like DNG is a common operation but many are concerned about the sanctity of the image data from the sensor.  The opportunity to ‘fingerprint’ that block of data and check it from time to time to ensure that there hasn’t been any disk corruption or I/O errors is a significant step forward in ensuring the archival safety of your images.  For the developer crowd, the DNG SDK has also been updated to reflect the changes to the specification.

The DNG Codec for Windows Vista users is also now available as a free download from Adobe Labs.   This is our first release for the Windows Codec platform and before finalizing the release we’re offering it as a ‘Release Candidate’ on Adobe Labs.  A release candidate is a version of the technology that is nearly complete but we would like the community’s help in ensuring compatibility across a wide variety of hardware and software configurations. 

On a final note, If you missed it earlier, you’ll want to check out John Nack’s blog post on the DNG format submission to the ISO.