Eric Scouten
I’m kind of a metadata addict. And a map junkie. So it should be no surprise that I’ve been waiting for a long time for a program \to help me mark up my photos with the exact location of capture. I was very happy to learn this spring of a new application called HoudahGeo. Most of the geocoding apps I’ve seen before only write to JPEG files. HoudahGeo actually works directly on PSD and DNG files, among others, meaning I can actually mark up my master files instead of a derivative.

HoudahGeo is available only for Mac OS, and I’m not aware of any plans to make a Windows version available. I haven’t looked for a similar Windows application, but the tips below regarding how it would interact with Lightroom should apply if so. (Please add a comment if you’re aware of a good counterpart for Windows.)
In the Field
If you have a hand-held GPS unit that you can carry with you, the main thing you need to be concerned with is ensuring that your GPS and camera clocks are in sync with each other. Spend the time to get your camera within a minute or less of the GPS clock. If it’s not the same time zone, that’s OK; you can take care of that later.
And, of course, you need to have your GPS running while you’re shooting. I keep mine permanently tethered to the outside of my camera backpack. When I’m packing, I simply put the GPS in an outside pocket, leaving the tether cord in place. When I take the camera out of the pack to start shooting, I pull the GPS out, turn it on, and run its tether through the top handle on my camera bag so it’s not dangling. As long as the camera backpack stays on my back, I’m logging my location continuously.
Downloading Data
How you download data will, of course, be dependent on the make and model of your GPS unit and the software that comes with it. HoudahGeo claims to be able to read directly from the GPS unit. I like to keep the original GPS track log files, so I haven’t tried this feature myself. What is important is that you wind up with a GPX file. GPX is a standard interchange format for GPS marker data; you should be able to save to that format from whatever software comes with your GPS unit. The MapSource software that comes with my Garmin GPS can generate GPX files through its “Save As” menu item.
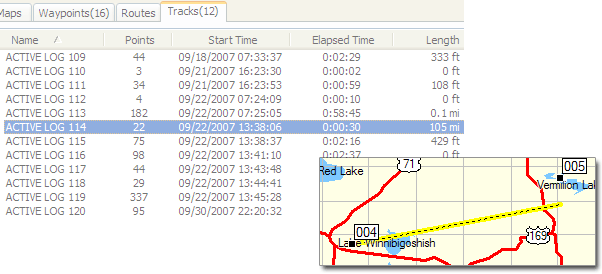
When you’re downloading data from your GPS, you should take a moment to look for bogus data in your track logs. Whenever you move with your GPS unit turned off (even a short distance), it will generate a lot of noise when you first turn it on again. (For example, see this rather improbable traversal of 105 miles in northern Minnesota that I supposedly accomplished in 30 seconds.) HoudahGeo isn’t able to sort out this errant data, so any photos taken shortly before or after turning on your GPS might get tagged with wildly incorrect locations. Take the time to use your GPS software to delete these incorrect data points.
Once you have a cleaned up GPX file, you’re ready to go!
A Caution
I generally convert all of my camera raw files to DNG as part of my import workflow. I’ve only occasionally used HG with original RAW files, and the results were not quite what I had hoped. If possible, I recommend using PSD, JPEG, and DNG files instead; I’ve done thousands of these files successfully.
Geocoding in HoudahGeo
At this point, you should open both HoudahGeo and Lightroom. In Lightroom, choose one or more photos that you are ready to tag. Make sure to exclude virtual copies since HoudahGeo can’t do anything with them. (To exclude virtual copies, click on the negative strip icon just just above the filmstrip at the bottom of the Library window as shown below.)

Unfortunately, any geocoding you do in HoudahGeo won’t get propagated to existing virtual copies in your library. This is a known bug in Lightroom. Any virtual copies you create after geocoding will retain this information.
Drag these photos from Lightroom into HoudahGeo. After a brief pause, they should appear in your HoudahGeo project window. You may also be asked to specify the time zone for the camera’s capture dates. Make sure to leave these same photos selected in Lightroom; you’ll need this selection later in the process.
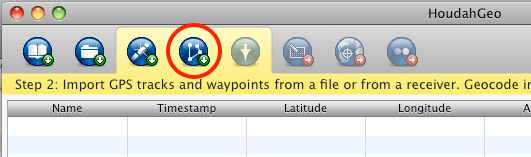
If you have a GPX file, now is the time to load it in to HoudahGeo. Click on the waypoint button (highlighted below).
Once you’ve done that, HoudahGeo should automatically match the track log data with your camera’s capture time stamps. Assuming the camera and GPS were in sync (as described above), these should be fairly accurate, but I recommend that you always spot-check a few of the locations. Select a single photo in the list and click on the down-arrow icon just to the right of the waypoint button. HoudahGeo will bring up a map with the location it has assigned to this photo. Verify that this location is correct. If not, you may need to adjust the time zone or the camera clock error setting in HoudahGeo.
If you don’t have a GPX file, or if the file has gaps (i.e. you were shooting with the GPS turned off or in an area with poor coverage), you can also use this map button (the rightmost button in the yellow group) to manually assign locations.
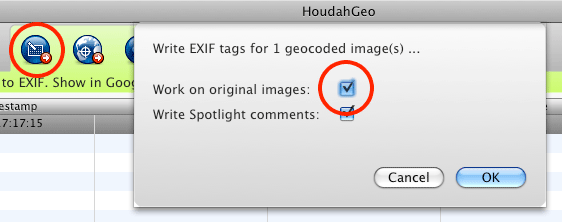
Once you are satisfied that your photos have accurate locations, it’s time to save the changes back to the files. Click on the first button in the green tab (with the tooltip “Write EXIF Tags”). Be sure to click on the checkbox labeled “Work on original images.” Otherwise, Lightroom won’t see the changes you’ve made.
At this point, you’re done in HoudahGeo. It’s time to go back to Lightroom and make sure it sees the changes.
Bringing Lightroom Up to Date
Back in Lightroom, the same photos should still be selected.
The first thing you should do is select Save Metadata to File from the Metadata menu. Yes, I know this seems odd. It seems like it would overwrite the new metadata you just created in HoudahGeo, but it doesn’t. This command causes Lightroom to update the XMP in the file, but not the EXIF data. Geocoding information is stored in EXIF. What you’re doing here is ensuring that the XMP in the file reflects any changes you’ve made in Lightroom.
Even if you think your XMP is up to date, I still recommend that you perform this step. I have seen cases where keywords will be read back incorrectly, especially in JPEG files containing keywords with letters outside the US ASCII set (typically letters with accents). Saving will help prevent this problem.
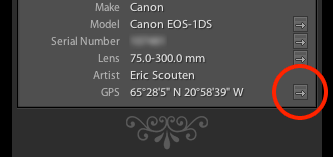
Wait for this operation to finish, then select Read Metadata from File with the same photos still selected. Lightroom will now read back the same metadata you’ve just written to the files, and also pick up the updated EXIF metadata including the geocoding. You can able to see this new metadata if you have the Metadata panel set to the EXIF, Location, or All tag sets. If you like, you can verify the location by clicking on the right-arrow button to the right of the GPS location (highlighted below). This will bring up a map with the location.
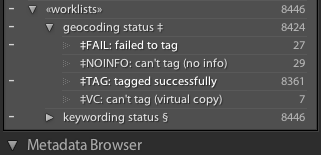
Finally, I recommend that you assign a keyword to each photo that you’ve geotagged so you can keep track of what you’ve done and what hasn’t yet been tagged. See my previous article on worklist keywords to help you remember what you have and haven’t tagged. Here are the keywords I use in Lightroom:
Happy geocoding!