Kelly Castro is an amazing photographer who also happens to be a quality engineer on the Lightroom development team. He has put together a short blog post on creating and using local adjustment presets in Lightroom.
Check out Kelly’s black and white tutorial here and his flickr photostream here
On first glance, the Local Adjustment Panel in Lightroom 2 can be a little intimidating.
One way to make this powerful feature easier to use is to take advantage of its ability to save regularly used groups of effects as presets. Like other types of presets available throughout Lightroom, the Adjustment Brush and Graduated Filter presets allow you to spend more time enhancing your images and less time dialing in settings.
Saving a Local Adjustment Preset is simple. To see how simple, let’s take a step-by-step look at the creation of two presets that are useful for portrait retouching.
Iris EnhancementA great way to give your portraits some “pop” is to enhance the eyes. The eyes are generally the first place a person looks when viewing a portrait, so it’s a good idea to pay attention to both the iris (the colored area) and the sclera (the whites). For this example, I’ll demonstrate the creation of a preset that you can use to enhance the iris.To get started, select a portrait in the Library and press K. This will simultaneously open the image in the Develop Module and expand the Local Adjustment Panel.Click the “Show Effects Sliders” button in the upper-right corner of the Local Adjustments panel to display the individual effects sliders. Start by increasing the Exposure slider to 0.69, bumping up the Saturation to 70 and adding some localized contrast by pushing the Clarity slider to 66.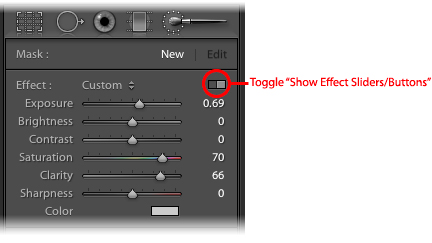 At this point, zoom in on the image so that the eyes are prominent in the view window and try painting over one iris of the subject in your portrait. Is the effect too much? Too little? Either way, we are just looking for a starting point (you can adjust the amount of the combined effects at any time in various ways — but we’ll get to that later.)
before/afterFor now, let’s save these settings as a preset that we can use for iris enhancement. Click the Effect drop-down menu and select “Save Current Settings as New Preset…”. Name the preset “Iris Enhance” and click “Create” in the New Preset dialog. Your new preset will now be available in the Effect drop-down menu whenever you need it.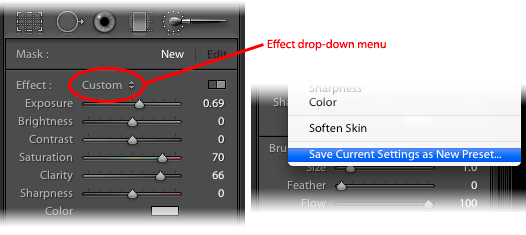 Teeth WhiteningNow that you have seen how simple it is, let’s set up another useful preset: Teeth Whitening.Even the brightest of natural smiles can often benefit from a little bump in brightness and the secret weapon of the digital dentist: desaturation.Again, select a portrait in the Library (preferably one where the subject is smiling) and press K. Click the “Show Effects Sliders” button in the upper-right corner of the Local Adjustments panel (if it isn’t already expanded), then click “New” and choose “Exposure” from the Effect drop-down menu. Increase the Exposure slider to 0.41 and drag the Saturation slider to the left until it reads -63. Click the Effect drop down menu and select “Save Current Settings as New Preset…”. Name the preset “Teeth Whitening” and click “Create” in the New Preset dialog.Now that you have the preset, let’s give it a try. Using a relatively small brush with a medium feather setting, brush over the subject’s teeth. If you go over the gums by accident, you can always hold down the Alt/Option key and erase any area that you didn’t intend to apply the mask to. Toggling the masked area using the O key on your keyboard will help you see how accurate your mask is.
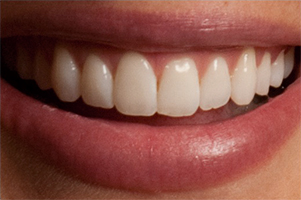

before/afterSubtlety is KeyIt can be easy to overdo either of these enhancements, so it’s a good idea to take a look at the navigator in the upper left corner of Lightroom to see if the effect is standing out too much or looking unnatural. If, for instance, the subject’s teeth look too bright after painting with the Teeth Whitening preset, simply switch back to button mode (by clicking “Show Effects Buttons” at the top right corner of the Local Adjustments Panel) and adjust the Amount Slider until the subject’s smile looks more natural.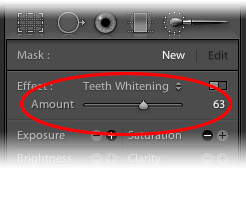 That’s it! Two quick presets that can be huge time savers.